Yeast Cultures are Like Nuclear Weapons

Back in the bad old days, a home brewer was happy just to have a reliable yeast culture to pitch into his/her wort. The average home brewer today is no longer content with having access to yeast cultures that get the job done without leaving a trail of metabolic trash that is a mile wide. He/she wants to be able to compute and hit the exact number of cells needed to ferment a given batch of wort. The cold hard truth is that this level of precision is neither obtainable, nor is it necessary in a home brewery. A yeast culture is like a nuclear weapon in that a brewer only needs to be within a reasonable distance of his/her target in order to complete the task at hand. In this blog entry, we will cover how the yeast biomass in a starter or fermentation grows, and why homebrewers are placing emphasis on precision where it is not needed.

Brewing yeast is a mystery to many home brewers. It is easily the most technically complex part of the brewing process, after all, brewers make wort, yeast makes beer. Fermentation is little more than controlled spoilage. In the case of beer, the spoilage microorganism is the yeast culture that we pitch. We want the pitched yeast culture to “own” the wort, and we want to ensure that it owns the wort quickly enough to prevent any wild microflora (yeast, bacteria, mold) that may have hitched a ride on airborne particulate matter from gaining a foothold in our fermentation. We accomplish this task by pitching a large number of active yeast cells while practicing good brewery hygiene.

Yeast cells go through three distinct phases during fermentation before entering a state known as quiescence. The phase that we will be discussing in this blog entry is known as the exponential phase (also known as the logarithmic phase). The exponential phase is where the yeast biomass grows. This phase is called the exponential phase because the cell count grows exponentially at a rate of 2n, where n is the number of minutes that have elapsed since the culture entered the exponential phase divided by the replication period in minutes (computer scientists who are reading this blog entry will recognize this growth pattern as O(2n), or binary exponential growth). The reason why the yeast biomass grows at a rate of 2n is because each mother cell buds a daughter cell during a replication period.

With the above said, let’s examine the basic formula for approximating the cell count at a given number of minutes into the exponential phase. yeast_cell_count_at_time_t = initial_yeast_cell_count * 2n, where n equals the number of minutes that have elapsed since the beginning of the exponential phase (time_t) divided by the replication period (replication_period) Let’s apply the formula shown above with time_t equal to 90 minutes and replication_period equal to 90 minutes.

time_t = 90 minutes into the exponential phase

initial_cell_count = 200 billion

replication_period = 90 minutes

n = 90 / 90 = 1 replication period

yeast_cell_count_at_time_t = 200 billion * 2^1 = 400 billion cells, where the symbol “^” denotes raised to the power of

After ninety minutes of exponential growth, the culture has doubled in size.

Let’s extend time_t to six hours, which equals three hundred and sixty minutes.

n = 360 / 90 = 4

yeast_cell_count_at_time_t = 200,000,000,000 (200 billion) * 2^4 = 3,200,000,000,000 (3.2 trillion) cells

After four replication periods, the cell count is now sixteen times larger than it was when it was pitched. Herein, lies the explosive power of exponential growth.

We can determine the number of replication periods necessary to reach a target cell count given an initial cell count by re-writing the equation to solve for n. We will refer to the variable n as the number_of_replication_periods and the variable cell_count_at_time_t as target_cell_count in our re-written equation.

number_of_replication_periods = log (target_cell_count / initial_cell_count) / log(2)

Let’s set target_cell_count to 3.2 trillion and initial_cell_count to 200 billion to verify that the formula produces the number 4 for the number of replication periods.

number_of_replication_periods = log (3,200,000,000,000 / 200,000,000,000) / log(2) = 4

With that said, the yeast calculator that we used for our latest recipe determined that we needed to pitch 200 billion cells. Our culture only contains 150 billion cells. How much impact will underpitching by 50 billion cells make in the amount of time necessary to reach maximum cell density for 5 gallons, which is approximately 3.8 trillion cells?

number_of_replication_periods = log (3,800,000,000,000 / 200,000,000,000) / log(2) = ~4.25

number_of_replication_periods = log (3,800,000,000,000 / 150,000,000,000) / log(2) = ~4.66

As long as there is enough oxygen in solution to support cellular health, the difference in exponential growth time between pitching 150 billion cells and 200 billion cells is 4.66 – 4.25 = 0.41 * 90 = ~37 minutes.

Okay, let’s pitch half of the number of cells that our yeast calculator computed.

number_of_replication_periods = log (3,800,000,000,000 / 100,000,000,000) / log(2) = ~5.25

Once again, as long as there is enough oxygen in solution to support cellular health, the difference in exponential growth time between pitching 100 billion cells and 200 billion cells is 5.25 – 4.25 = 1.0 * 90 = 90 minutes.

As one can clearly see, underpitching by as much as 50% only lengthens the exponential growth phase by 90 minutes. The key is to ensure that there is adequate dissolved oxygen to support cellular health when underpitching, as there is almost always enough carbon (sugar is carbon bound to water; hence, the term carbohydrate). While brewing species within the Saccharomyces genus do not respire in brewer’s wort due to being Crabtree positive, they do use oxygen for ergosterol and unsaturated fatty acid (UFA) biosynthesis by shunting oxygen and a small amount of carbon to the respirative metabolic pathway during the lag phase. These compounds are used by cells to maintain their plasma membranes. Plasma membrane health determines how well a yeast cell can take in nutrients and expel waste through its cell wall.

If yeast cultures are like nuclear weapons, why do we have pitching guidelines? Well, most pitching guidelines are for slurry, not laboratory grown yeast. Slurry is a mixture of various age cells that have been through one or more fermentations. These cells have been subjected to ethanol and brewery-related environmental stress. Most starters are grown from laboratory-cultured yeast. Laboratory-prepared growth media and environmental conditions are designed to maximize biomass growth while minimizing stress.

With that said, there is a significant challenge that places a lower bound on our pitched cell count; namely, sanitation. No real-world brewery is sterile. Airborne microflora has an opportunity to contaminate a culture or a medium every time it is exposed to air. Residual surface contamination from less than adequate cleaning and/or sanitation increases the chance of wild microflora gaining a foothold in a fermentation. Bacteria are the biggest threat because they too grow exponentially, but their replication period is one third that of yeast; hence, the bacteria cell count increases by a factor of eight every time the yeast cell count doubles. If we normalize the bacteria growth model to that of the yeast growth model, we end up with the equation shown below.

bacteria_cell_count_at_time_t = initial_bacteria_cell_count * 8n, where n equals the number of minutes that have elapsed since the beginning of the exponential phase divided by the yeast replication period

Since the bacteria cell count doubles in one third of the amount of time that it takes the yeast cell count to double, the bacteria cell count grows at a rate of 2^3 every time the yeast cell count grows at a rate of 2^1.

To give readers an idea of how this difference allows a tiny number of bacteria cells to overtake a larger number of yeast cells, let’s calculate the 2n and 8n multipliers out to 16 yeast eplication periods (n = 1 to 16).

Cell count multiplier for the 2n growth pattern = 2, 4, 8, 16, 32, 64, 128, 256, 512, 1024, 2048, 4096, 8192, 16384, 32768, 65536

Cell count multiplier for the 8n growth pattern = 8, 64, 512, 4096, 32768, 262144, 2097152, 16777216, 134217728, 1073741824858993459268719476736549755813888439804651110435184372088832281474976710656

After sixteen yeast replication periods, the yeast cell count can be as much as 65,536 times larger than it was when we started whereas the bacteria cell count can be as much as a whopping 281,474,976,710,656 times larger than when we started, that is, if there is sufficient carbon, oxygen, and space to support that much growth. Herein, lies the reason why we need to pitch a large number of cells. We want our yeast culture to rapidly shutdown the replication of competitors by dominating a batch of wort. In modern vernacular, we want the culture to “own” the wort to the extent that nothing else stands a chance of tainting our controlled spoilage process. However, that feat can be easily accomplished with modern commercial yeast cultures without having to worry about pitching a precise number of yeast cells.

In closing, hopefully readers have gained an understanding of the explosive nature of exponential growth. Exponential growth can basically erase a difference in cell counts that is less then a factor of two, and make up to a factor of four difference in cell counts insignificant, which is why yeast cultures are like nuclear weapons. There are even times when we want to purposely underpitch, but that is a topic for a future blog entry.


Shaken, not Stirred: The Stir Plate Myth Buster

Introduction

When I started to brew in early 1993, no one I knew used a stir plate. That count included all of the hardcore amateur brewers I knew at that point in time and throughout my first pass through the hobby.  I brewed all-grain beer and maintained a yeast bank on agar slants for over a decade before taking a hiatus to focus on my family.  When I came back to the hobby in 2013, everyone was using a stir plate and proclaiming that a stir plate was a “must have” if one was going to make starters.  My experience with yeast cultures did not align with this assertion.  However, being inquisitive, I played along and purchased a stir plate and bar.  The performance of my cultures did not match what was promised. The media was so foul smelling after turning off the stir plate that I ditched it and went back to my old way of making a starter.

This blog entry covers yeast propagation in general, claims made by proponents of stir plates, and my method of making and handling a starter.  My method is not the do all, be all yeast starter method, but it provides a simpler, lower cost way of making a starter that performs just as well, if not better than one made using a stir plate.

Yeast Propagation

The goal of yeast propagation is to transform a small number of yeast cells into a larger number of cells.  There are two basic types of propagation; namely, batch and continuous.  Propagation that is performed in steps with each step increasing the number of cells is known as “batch propagation.”  Propagation where an initial seed culture starts replication with a continuous flow of new culturing medium and O2 entering the process with new yeast cells continuously existing the process is known as, wait for it, “continuous propagation.”  Continuous propagation is significantly more complex than batch propagation.

Batch Propagation

Brewers and liquid culture propagators use what is known as batch propagation.  Batch propagation is used when the medium is above the Crabtree threshold, which is 0.2% w/v (a specific gravity of 1.0008).  The Crabtree effect states that whenever the medium is above the Crabtree threshold, Crabtree positive yeast cells will replicate using their anaerobic (fermentative) metabolic pathway even in the presence of O2.  All brewing yeast strains are Crabtree positive.  Brewing yeast cells never truly respire when grown in a medium that is above the Crabtree threshold.  Instead, they shunt O and a small amount of carbon (sugar is carbon bound to water) to the aerobic (respirative) metabolic pathway for the production of ergosterol and unsaturated fatty acids (UFA) during the lag phase.  Ergosterol (the plant equivalent of cholesterol) and UFAs keep cell plasma membranes pliable, which, in turn, allow sugar and waste products to pass through these membranes.

Continuous Propagation

Unlike batch yeast propagation, dry yeast propagators use continuous propagation.  They do so using something known as a bioreactor.  A bioreactor can keep the medium in a steady state below the Crabtree threshold while continuously supplying O2 .  The medium is stirred to keep it homogenous.  The stirring action creates shear stress, which is detrimental to yeast cell wall health.  However, it is necessary to keep the medium in a steady state.  Keeping the medium oxygenated in a steady state below the Crabtree threshold results in yeast cells using their much more efficient aerobic (respirative) metabolic pathway for reproduction.  Ethanol, higher alcohols, and esters are the result of the inefficient conversion of carbon to energy in fermentation.  These compounds are all carbon based; therefore, we can think of them as the yeast cell metabolism equivalent of incomplete combustion.  The byproducts of respiration are COgas and water.  Yeast cells derive two ATP (adenosine triphosphate) per glucose via fermentation and eighteen ATP per glucose via respiration (ATP is what powers yeast cells).  In effect, the respirative metabolic pathway is nine times more efficient than the fermentative metabolic pathway.  What this increase in carbon utilization means to dry yeast producers is that they can use less carbon than liquid yeast propagators for any given cell count.  Not only that, yeast cells propagated via the respirative metabolic pathway have fully charged ergosterol and UFA reserves when they are pitched, which significantly reduces initial dissolved O2 requirements, usually completely alleviating the need to oxygenate wort.

Claims Made by Proponents of Stir Plates

If I had a dollar for every time a new brewer was advised to purchase a stir plate for making yeast starters, I would be able to build a very nice custom brew house.  As mentioned above, a stir plate has become a “must have” piece of equipment after a new brewer advances beyond the kit beer stage.  In my humble opinion, a stir plate is a “not needed” piece of brewing equipment.   What bothers me are the claims made when discussing stir plates, none of which appear to be grounded in science.  That being said, let’s examine claims made by proponents of stir plates.

Oxygenation

It is claimed that stir plates oxygenate yeast cultures.  However, anyone who has studied physics and chemistry knows that the shape of an Erlenmeyer flask does not lend itself to Oabsorption.  The conical shape of an Erlenmeyer flask combined with its rapidly narrowing cone leads to a small specific surface area in which Ocan be absorbed.  People claim that spinning the bar fast enough to create a vortex improves oxygenation.  To a point, that claim is true because it results in an increase in specific surface area.  However, doing so comes at a cost to yeast cell wall health due to shear stress caused by the spinning bar (i.e., the spinning bar is a source of friction for the yeast cells in a starter).  Shear stress is something that has been well studied when it comes to the production of dry yeast.

Cell Suspension

Many amateur brewers use the argument that stir plates keep yeast cells in suspension.  This claim is true, but the cells that a stir plate keeps in suspension are non-viable and cells prone to early flocculation, neither of which are desirable. The counter to this argument is that brewing yeast cells do not need to be stirred to remain in suspension because they express the NewFlo phenotype.  NewFlo yeast strains do not flocculate until they have consumed all of the mannose, maltose, sucrose, glucose and the sugars that they can reduce to one of these four sugars in the wort, including maltotriose, which is composed of three glucose molecules bound by two glycosidic bonds (a molecule of maltotriose is first reduced to a molecule of glucose and a molecule of maltose, which is then reduced to two molecules of glucose).

Higher Cell Count

The reality is that all propagation mediums have a maximum cell density that places an upper bound on the number of viable cells that can be produced given a specific volume.  The generally accepted rule of thumb in brewing is two hundred billion cells per liter. The amount of yeast sediment available after a yeast culture has entered quiescence and sedimented does not matter.  What matters is the number of viable cells in the yeast sediment.

Healthier Yeast

There is not a more troubling claim in amateur brewing than stir plates produce healthier cultures. Not only is this claim wrong, the practice of allowing a starter to enter quiescence and settle out, so foul smelling medium that is the result of stressed yeast cells can be decanted misses the point.  What we are doing when creating a starter and then pitching it into a larger batch of wort is known as step propagation.  Allowing a starter to ferment out places the cells in a quiescent state where they have undergone morphological changes to guard against starvation.  An important morphological change that occurs is thickening of the cell wall.  That morphological change occurs in order to extend the time between sedimentation and autolysis, which occurs when a cell wall breaks down and releases the contents of a cell.  Allowing a culture to enter quiescence extends lag time because the cells have to reverse the morphological changes they underwent before they can go about replenishing their ergosterol and UFA reserves.

Shaken, not Stirred

I remember the pushback I received when I introduced the Shaken, not Stirred method for making and pitching a starter on the American Homebrewers Association forum.  The response I received made me feel like I had slapped someone’s puppy.  People could not believe that something so simple could perform as well, if not better than a stirred culture.  However, one by one, forum members started to give my starter method a shot.  It was like the floodgates of acceptance opened after Denny Conn gave it a shot and wrote about his experience.  Let’s discuss how SNS came about and why it works so well while being simple and low cost.

Background

The Shaken, not Stirred (SNS) method of making a starter is something that I stumbled upon in the early nineties.  It was the result of being much stronger than I am today due to being a gym rat in my twenties and early thirties.  SNS started out as just a way to disperse yeast cells after inoculating a starter.  I was using a repurposed forty-eight fluid ounce Ocean Spray glass container to make quart-size starters. That container broke one day, so I used the only other glass container I had on hand with a screw on cap, which was a one-gallon glass jug.

Specific Surface Area

After I switched to using a one-gallon jug for making quart-size starters, I noticed that the increased volume of the container combined with intense shaking resulted in a large portion of the medium being transformed into foam.  The difference in lag time and fermentation strength appeared immediately.  However, it took a couple of months before the engineering side of my brain recognized why the SNS method produced a higher quality starter. The secret sauce is the large amount specific surface area provided by foam, which allows for significantly more O2 absorption than the standard air to liquid interface.  In essence, SNS is a poor man’s Obottle.  One can achieve the same result with an  O2  bottle and a diffusion stone.  It is just that SNS achieves this feat in a much simpler, lower cost way.

Pitch Timing

With that said, it is not just the shaking in the SNS method that leads to a higher quality starter.  It is the fact that the method involves pitching the entire starter at high krausen.  High krausen is the point where the culture switches over from exponential growth to the stationary phase where replication is for replacement only.  Allowing a culture to ferment beyond this point results in wasted ergosterol and UFA reserves.  These compounds are produced during the lag phase and are shared by mother cells with all of their daughter cells.  We do not want to allow a starter tor ferment past high krausen because doing so will result in extended lag times and higher initial Orequirements in order to allow mother cells to rebuild the ergosterol and UFA reserves that were wasted on replacement replication during the stationary phase.  Remember, yeast cells are in a battle with bacteria cells for ownership of the wort and bacteria cells replicate three times in the period of time that is required for the yeast cells to replicate; therefore, anything we can do to shorten the lag phase is beneficial to fermentation.

Closing Remarks

The “stir plates produce higher viable cell counts and healthier yeast cultures than other methods” myth is just that, a myth.  Every starter volume has a maximum cell density, which if met before available sources of carbon have been depleted cannot be exceeded.  My suggestion is to give the SNS starter method a try.  All one needs is a sanitizable container that is at least four times the volume of the starter wort (I use a five liter media bottle for one liter starters).  The starter medium can be shaken before or after pitching.  It depends on one’s threshold for yeast cell stress becase the initial shake needs to be performed like the starter wort owes one money.  For people new to this technique, I recommend pitching after shaking.  If one pitches after shaking, the starter will need to be shaken a second time to disperse the cells, albeit much more gently.   The goal is to attempt to transform as much of the starter wort into foam as is humanly possible. The photo shown below is my old five-liter media bottle (there was a liter of liquid before the shake).


The Difficulty of Triangle Testings – A Practical Example

Let’s talk the triangle test. You know that simple thing we try and do to prove that changes in brewing do or don’t make a difference. We put a lot of stock in the conclusions of that test. What does it really mean?

On the face of it, it’s a simple prospect – “Dear Sir/Madam, I present you three glasses. Pick the one that’s different.” It feels so absurd, so childish, so easy that it’s insulting that you’d be asked to choose.

All of us – ok, almost all of us – have enough belief in our powers of taste, observation, deducation, umm… tactics? – whatever… We all truly think that unless it’s something truly miniscule, we’ve got this. Give me those silly glasses!

And yet… it’s really, really, really hard. (Three really’s because three glasses)

The other week, Denny and I were in Sydney after attending the wonderful Australian National Homebrewers Conference in Melbourne. Paul Nickodem invited us to come up and give a talk about experimentation.

So we set up at Batch Brewing (you’ll be hearing more from them in Episode 80 of the podcast) and we decided we’d show people how to run a triangle test as a “practical” example – aka “stop listening to us talk for a few moments and watch this magic trick”, the cornerstone of real entertainment.

The Best Sort of Brewery Visitor

We didn’t have an experiment to run, no grand thesis to prove or data to collect – just a simple demonstration.

The Targets

For that purpose, we chose two “similar” Batch Brewing beers for our testers to taste. One was their “Just Beer“, a 4.5% plain lager – a simple beer with fruity Aussie hops, made for warm weather and easy drinking. The other – their Das Bohemian Pils – clocks in at 5.0% full of Saaz. Different hops, different strengths, different base malts – this should be an easy test! (And a delicious one as well!)

During our talk, it came time to do the triangle tango. We walked people through the ideal test. We could tell that the audience was questioning – “really? how hard could this be?”.

Three brave volunteers raised their hands and they were brave because let’s face it, it had to be a setup. Why else would we do it? (Note – all three were experienced homebrewers/drinkers.)

Each taster got a flight of three glasses – sparkling clear glass glasses (see below) – you know, the one’s you’re not supposed to use for a triangle test to avoid visual influence. It’s the best possible scenario for tasters. Except that it was at night, in a noisy brewery with lots of people staring at them. (Ideally, opaque cups, quiet, smell free environment with plenty ofl lighting)

You Can Tell The Difference Between These – Right? (Just Beer on left, Das Pils on right)

They tasted, smelled and furiously thought through the three samples. I’ve seen less intense game faces at technical interviews. When everyone indicated they had a decision, we called for a show of hands.

The result – and this shouldn’t be a surprise given that I’ve typed this many words – all three tasters picked a sample that was part of the paired beers. They all skipped the “different” beer – in this case, the Pils.

This is really hard stuff!

I watched one taster go through the beers and almost immediately choose the different beer. He then went back through and tasted again. He then talked himself out of his initial choice.

Takeaway

The takeaways on this little test, because, as we said, it wasn’t about data.

  1. Triangle tests are deceptive. They seem an easy thing, but in truth are hard
  2. This is true even when the difference “should” be obvious. (In this case two related, but entirely different styles/recipes)
  3. Any set of triangle tests that reaches the threshold of significance really should standout.
    1. The Flip Side Corollary – a triangle test that fails to reach a significant p-value doesn’t really mean “no difference” as much as “not blindingly obvious difference”
  4. Props to anyone who tastes one of these tests – you’re probably going to “fail”- it’s the nature of these things!

A Final Word About the Triangle’s “Real” Purpose

The Man To Blame For T-Tests

That man was William Sealy Gosset and he was a statistician in the employ of Guinness Brewing. He developed the Student’s T-Test (had to call himself Student because Guinness didn’t want others to discover that they were using math/science to improve their beer) to help determine if statistically small samples, like a tasting panel were indicating something meaningful.

In the homebrew world, we tend to look at these tests and say “so does this make a difference?”, treating it like a curiousity. Maybe we’re looking to save time or effort.

But make no mistake – for a commercial brewery – the purpose of the triangle test is almost always “can we make the beer for less” – whether it’s by substituting cheaper ingredients or using more efficient processes. It’s all about shaving pennies from each unit sold because that’s the nature of business.

Inherently that’s a perfectly sensible proposition. We’re trying to save time/effort, they’re trying to save money.

But it’s important that we don’t lose site that incremental changes, like those ideally tested by a triangle test, can ultimately lead you far away. Take a look at the disaster that befell the one time #1 beer in America – Stroh’s. They pushed their process improvement too far with ultimate consequences for the company. (Their former glorious LA brewery is now a used car auction lot.)

Regardless…. Triangle Tests are hard and thanks to the fine folks at Batch Brewing for letting us prove it with their beers!

Peace!

Denny’s Seafood Recipes

Beer Poached Salmon with Tarragon Mayo

4 salmon steaks, 1-inch thick

12 ounces beer (nothing too hoppy…I prefer Bitburger)

2 tablespoons lemon juice

1 medium onion, chopped

1 celery stalk, chopped

1 teaspoon salt

1 bay leaf

3 or 4 peppercorns

Tarragon Mayonnaise:

1/2 cup mayonnaise

1/4 teaspoon dried tarragon

1 teaspoon minced chives

1 teaspoon chopped green onion

1/ 4 teaspoon Tabasco

1 teaspoon minced parsley

ln a skillet, combine beer, lemon juice, onion, celery, salt, bay leaf and peppercorns, bring to a boil and simmer for 10 minutes. Add salmon steaks, cover and simmer 15 minutes.

Combine ingredients for tarragon mayonnaise and serve with salmon.


Dungeness Crab Cakes

Look for Old Bay Seasoning in fish markets and some supermarkets.

1 pound cooked Dungeness crab meat

1 egg, beaten

Panko or 1/2 cups finely crushed saltines (about 35 crackers) (use as little as possible to get the cakes to bind)

1 teaspoon fresh lemon juice

1 teaspoon Dijon mustard

2 tablespoons finely chopped green onion, including some tender green tops

¼ cup mayonnaise

1 teaspoon Worcestershire sauce

½ teaspoon salt

1 teaspoon Old Bay Seasoning

¼ teaspoon pepper

1 tablespoon butter or margarine

2 tablespoons vegetable oil

Red Bell Pepper Sauce recipe follows)

Lemon wedges, for garnish

Flake crab meat into a large bowl. Add egg and 3/4 cup of the crushed crackers and mix well. Add lemon juice, mustard, onion, mayonnaise, Worcestershire sauce, salt, Old Bay Seasoning and pepper. Mix well and form into 8 crab cakes each about 1/z-inch thick.

(Optional) On a piece of wax paper, spread remaining 3/4 cup cracker crumbs. Coat cakes on both sides with crumbs or panko.

In a large skillet over medium high heat, melt butter with oil. Add cakes and cook, turning once, until golden brown, 2 to 3 minutes on each side. Transfer to a warmed platter and garnish with lemon wedges. Serve immediately with Red Bell Pepper Sauce. Serves 4.

Red Bell Pepper Sauce

1 large red bell pepper

2 cloves garlic, cut up

2 teaspoons red wine vinegar

1/4 teaspoon salt

1/2 cup light mayonnaise

1/4 cup light sour cream or nonfat plain yogurt

Salt and pepper to taste

Preheat broiler. Cut pepper in half lengthwise and remove stems, seeds and ribs. Place skin side up on a foil-lined baking sheet. Broil 4 inches from heat, turning to expose all sides with skin, until evenly charred and blackened, 10 to 15 minutes. Remove and fold foil over pepper and allow to steam for 15 to

20 minutes. Peel off skin and cut pepper halves into pieces and place in food processor. Add all remaining ingredients and process until smooth.  Makes 1 cup


Fish Meuniere with Browned Butter and Lemon

0.5 c all-purpose flour
4 sole or flounder fillets, 5 to 6 ounces each
Salt and ground black pepper
2 T vegetable oil
2 T unsalted butter, cut into 2 pieces

Browned Butter

4 T unsalted butter, cut into 4 pieces

1 T chopped fresh parsley leaves

1.5 T lemon juice

1 lemon, cut in wedges for serving

Instructions

1. *FOR THE FISH:* Adjust oven rack to lower-middle position, set 4
heatproof dinner plates on rack, and heat oven to 200 degrees. Place
flour in large baking dish. Season both sides of each fillet
generously with salt and pepper; let stand until fillets are
glistening with moisture, about 5 minutes. Coat both sides of
fillets with flour, shake off excess, and place in single layer on
baking sheet. Heat 1 tablespoon oil in 12-inch nonstick skillet over
high heat until shimmering, then add 1 tablespoon butter and swirl
to coat pan bottom; when foaming subsides, carefully place 2 fillets
in skillet, bone-side down. Immediately reduce heat to medium-high
and cook, without moving fish, until edges of fillets are opaque and
bottom is golden brown, about 3 minutes. Using 2 spatulas, gently
flip fillets (see illustration below) and cook on second side until
thickest part of fillet easily separates into flakes when toothpick
is inserted, about 2 minutes longer. Transfer fillets, one to each
heated dinner plate, keeping bone- side up, and return plates to
oven. Wipe out skillet and repeat with remaining 1 tablespoon each
oil and butter and remaining fish fillets.

2. *FOR THE BROWNED BUTTER:* Heat butter in 10-inch skillet over
medium-high heat until butter melts, 1 to 1 1/2 minutes. Continue to
cook, swirling pan constantly, until butter is golden brown and has
nutty aroma, 1 to 1 1/2 minutes; remove skillet from heat. Remove
plates from oven and sprinkle fillets with parsley. Add lemon juice
to browned butter and season to taste with salt; spoon sauce over
fish and serve immediately with lemon wedges.


Shrimp or Scallops in Diablo Sauce

Ingredients:
– (Salt to taste)
– 1 teaspoon cumin ( seed)
– 1 tablespoon ginger (fresh finely grated)
– 1 tablespoon olive oil
– 3 shallot ( peeled and chopped)
– 1 teaspoon salt
– 1 1/2 cup chicken stock
– 3 habanero ( or serrano chiles; seeded and chopped, up to 5)
– 1 juice (limes ; of, up to 2)
– 1/2 mango (ripe peeled and diced)
– 1 pound shrimp (large peeled and deveined)
– 1 tablespoon vegetable oil
– 2 red bell pepper ( chopped)
Directions:
Make the Diablo Sauce: Heat the olive oil in a pan, stir in shallots, garlic, and cumin, and saute for several minutes, until they are an even golden brown. Adding one item at a time and stirring every ten seconds between additions, add the chiles, ginger, and red peppers; when they are all in, stir for 30 seconds more. Stir in the mango and toss briefly (15 seconds). Pour in the chicken stock and bring to a boil; reduce heat and simmer 20 minutes to blend flavors and soften peppers. Puree in blender, transfer to a bowl, season with lime juice and salt. For the shrimp: Season shrimp lightly with salt. Set a frying pan over high heat, add the oil, and when very hot and almost smoking, toss in the shrimp. Toss and turn for a minute, then pour in enough of the Diablo Sauce to coat well, and continue tossing and turning until the shrimp are fully cooked, a minute or so more. Notes: Diablo Sauce will keep for a week refrigerated, or may be frozen. Serving Ideas: Serve over rice.


Baked Stuffed Lemon Sole Recipe

Ingredients

4 tablespoons butter

3 tablespoons olive oil

1 small onion, chopped

1 small zucchini, unpeeled and chopped

1/2 cup chopped fresh mushrooms

1/2 pound sea scions, chopped

1/2 pound small (“salad size”) peeled and deveined shrimp (if using larger shrimp, coarsely chop)

1 1/2 teaspoons seafood seasoning blend (recommended: 01d Bay)

1 3/4 cups crushed cracker crumbs (about 1 1/4 sleeves of crackers) (recommended: Ritz)

Salt and freshly ground black pepper

8 thin lemon sole or other whitefish fillets, such as haddock (about 2 pounds total)

2 tablespoons butter, melted

Lemon wedges

Directions

In a 1arge skillet, heat the butter and oil. Add the onion, zucchini, and mushrooms. Cook over medium—high heat, stirring often, until the vegetables are softened and 1ight1y browned, about 6 minutes. Add the scallops, shrimp and seafood seasoning and cook, stirring, until the seafood is just cooked through, 3 to 4 minutes. Remove from the heat.

Add the cracker crumbs and season to taste with salt and pepper. (The stuffing can be made up to 1 day ahead and refrigerated. Leftover stuffing can be frozen. Bring to room temperature or take the chill off in the microwave before stuffing the fish.)

Preheat the oven to 400 degrees F.

Brush a 1arge glass baking dish generously with melted butter. Season the fish fi1lets on both sides with salt and pepper. Arrange 4 of the fillets in the baking dish. Cover with stuffing, pressing it in to make an even layer, and top with the remaining fillets. If some of the seafood stuffing spills out into the dish, that’s fine. Brush the fish with melted butter.

Bake in the preheated oven unti1 the fish is opaque in its thickest part and the stuffing is heated through, 20 to 30 minutes, depending on the thickness of the fish. Garnish with lemon wedges for squeezing over the fish.

The Saison Files – Tasting Yeast Bay, Fermentis and the Loral Canyon “American Noble” Saison

Time for another tasting! This time I’m going through two more Yeast Bay strains and Fermentis new dried Saison yeast – BE-134. And then, we get to taste the real humdinger – my Loral Canyon Saison using YCHops “American Noble” version of Loral. What happens when you use the less intense stuff? You get something I’m super jazzed about!

Drew’s Favorite Gin Recipes

Here you my fellow Gin heads! A few simple recipes to make the Gin flow…

The Martini

3 oz Gin (I like a 50/50 blend of Plymouth and Hendricks or 100% St. George’s Terroir)

0.25 oz Dolin Dry Vermouth

Chill a cocktail glass with ice water

Fill a mixing glass with crush ice. Add vermouth and gin, stir for 30 seconds, double strain into freshly dumped cocktail glass.

Add 2 olives or a lemon twist to the glass.

The Negroni

2 oz Gin

1 oz Campari

1 oz Sweet Vermouth

2 dashes Orange Bitters

Chill a rocks glass with ice water.

Fill a mixing glass with solid ice (less dilution). Combine ingredients and stir for 30 seconds. Strain and serve over a large ice cube. For a flourish, squeeze a slice of orange peel over the glass.

Gin & Tonic

2 oz Gin (really like a strongly flavored gin here)

Squeeze of Lime juice

2-4 dashes Aromatic Bitters (I like Scrappy’s)

4 oz Tonic Water (the good stuff like Fever Tree or Jack Rudy’s Syrup or &Tonic Syrup (both diluted with soda water)

Fill a tall glass (I use my imperial pint dimple mug) with crushed ice. Add lime juice, bitters and gin, give a quick stir. Add tonic water or tonic syrup with soda water. Stir to combine. For me, I like enough bitters to pop a bright pink color.

The French 75

1 oz Gin

1/2 oz Lemon juice

splash of simple syrup

Champagne to fill

Combine gin, lemon juice and simple syrup in a shaker glass with crushed ice. Shake for 15 seconds. Strain into a chilled highball glass or Champagne flute. Top with Champagne and stir to combine.

Pocket Randall Instructions – or How to Build Your Own Randall F*cker


Drew, Marshall and Josh talk about the Randall F*cker

The Setup (aka Drew Talks)

If you listened to Episode 42 of the podcast, you know that Marhsall Schott (Brülosophy) and I wandered around the Southern California Homebrewers Festival interviewing various silly people and enjoying ourselves. We conducted our interview with Kevin Baranowski behind the Maltose Falcons’ booth. We wandered out of the booth after the interview and were immediately confronted with a strange sight – a man funnelling beers into a metal gadget, closing valves, squeezing triggers and opening more valves to pour the beer.

Being armed with microphones and bellies full of bourbon espresso infused sweet stout, we naturally had to confront this hooligan. You can listen to our interview with said hooligan, Joshua Kunkle, in Episode 44 of the podcast (49:08). In the process of explaining his Randall F*cker, he really blew our minds with the creative re-use of gear to produce a different beery experience.

Much like Drew’s beloved iSi Whipping Siphon trick, Josh’s Randall uses the pressurizing effects of CO2 to rapidly infuse the oils and flavor compounds of a substrate (orange peels, herbs, spices, hops, etc) into the beer. He pours the beer via a funnel into a pressure chamber, hits it with CO2, and then after a few seconds opens a service valve to pour the beer into a waiting glass.

Josh reused a stainless steel filter he purchased from a defunct brewery to create the pressure chamber, but you can use whatever is handy and can hold pressure. (In theory, you could use a thick walled whole house filter, but remember those aren’t meant to be a pressure device and we just saw what can happen with a plastic device under pressure – granted that was at a much higher pressure, but still.)

Homebrewers being homebrewers – y’all wanted to know how to build this – so here you go! I present Josh’s guide to building your own Randall F*cker. Go forth and infuse your beers!

Josh’s Instructions


The cap of the infuser is the hardest part to assemble on account in includes the flow-in for both the CO2 and Liquid needed to create the infusion process. If you go with a filter housing, make sure to have the liquid flow in through the “In” side of the filter housing cap and the CO2 flow into the “Out” side of the cap. Since the CO2 side is pushing the pressure in, it doesn’t need a ball valve like the liquid side.

This infuser uses a trigger mechanism as seen below. This can usually be found at either a homebrew supply shop to help push corny kegs, or at a bicycle supply shop for blowing up one’s bike tire really fast. The threaded piece fits nicely over the male compression fitting on the filter housing cap

The filter housing chamber is where all the magic happens for this device. The chamber, as seen in the pic below, has two layers of a fine mesh screen to help filter out any big chunks of whatever fruit,
vegetable, or hop you put in the chamber itself to be infused. The screen came from cutting up one of those screens you find at restaurant supply shops that go over a pan being used for frying food.

The bottom of this particular filter housing had a means to attach a ball valve, which works great to release the infused liquid right into a cup when ready. For those that may go the plastic filter housing
route, you may need to drill this part out and attach your own ball valve in place for the same effect.
One thing that may be worth fixing on my design if you can do it is to create some sort of pressure release valve on the filter housing cap so that it releases pressure as the liquid flows into the chamber, which can speed up the flow into the chamber itself.

Best of luck, enjoy, and have fun!

[Ed. Note: See a Whole House Filter or keg for the kind of PRV Josh’s talking about]

Using the Randall F*cker

  1. Add your substrate to the chamber (Joshua was using orange peels in his demonstration at SCHF).
  2. Seal the device
  3. Open the input valve, pour in the beer.
  4. Close the input valve, squeeze the CO2 injector trigger.
  5. Wait 10 seconds, open the output valve and enjoy your infused beer.

Look Ma, I’m in the Library!

A few months back, I was contacted by Tiah Edmunson-Morton of Oregon State University and the Oregon Hops and Brewing Archives. In an interesting turn of events, they wanted to talk to me about Oregon, homebrewing and my part in the whole scene. They are even archiving all the work we’ve done and adding it to their collection which includes the pioneering and humbling work of Fred Eckhardt. Watch below to learn about me, Iowa, concert touring, how close I came to corrupting America’s youth as a teacher and, well, the whole brewing thing (as well as my partnership with Drew and where we differ)

After you’re done there, go listen to the other pieces that Tiah and company have collected – including some of our favorites like Dave Wills of Freshops, Lisa Morrison of Belmont Station (amongst other efforts) and see previous guests like our favorite lab guru, Dana of Oregon Brew Lab and Teri Fahrendorf. Seriously, go spend a few days on their interview page and learn a ton!

A Small Matter of Weight

Fat Drew / Not So Fat Drew
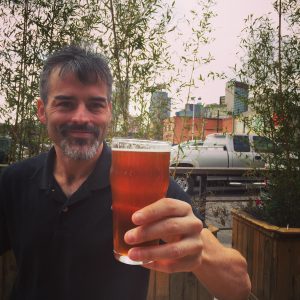
Left: December 26th, 2014 – I dug this picture. First one of me in a long while. (over 270 lbs). Right: September 2016 – Tasting my Saisons Also, how do I always forget to shave? – (~170lbs)

WARNING: You’re entering a really non-beer zone. What follows is an article I originally wrote about a year ago. Why post it now? Because it turns out this is exactly the time of year when everyone’s “I’m eating healthier. Going to exercise! Get in shape! It’s on like Donkey Kong” resolutions suddenly go out the window. So here’s your extra motivation – keep going – it’s possible! (FWIW – I’m still sitting at 170lbs – not too shabby!) 

Our passion and pursuit of brewing knowledge and perfection comes at a somewhat heavy price – our waistlines. A great many homebrewers face the great modern epidemic of growing girth with a major disadvantage – namely, the extra calorie burden of a great tasting beer.

I’m one of them. Hi, my name is Drew and I’m a recovering fat person. I’m also the goof responsible for a lot of scribbling about beers both sublime (Pliny the Toddler) and ridiculous (Clam Chowder Saison!). In November 2014, I stepped on the scale at my doctor’s office and blanched in horror as the scale crossed the previously unsummited peak of 270 lbs. On my 5’10” frame that so ridiculously gargantuan as to make me laugh-cry. But here’s the sad part – that wasn’t enough. Even with years of wishing to change, worsening health and a holiday trip that almost saw me losing exit row seats because I could barely fit the seatbelt about the expanse of epidermis – I still didn’t change.

What finally kicked me down the road to a better me – getting sick. An epic two-week bout of Peruvian Guinea Pig Death Flu finally did it. On January 4th, 2015 I had my homebrew club meeting. Did my official educational song and dance, went home and promptly fell into bed. For two long miserable weeks I survived on a diet of warm chicken broth and Theraflu. Coming out the other side, I found my weight was at 260. That’s what it took. After that little bump, I wasn’t looking back.

But what about the beer? We’ll get there.

A Quick Note About All Things Dietary & Health

I am not a doctor, a registered dietician, nor an expert of any variety. I’m an engineer with an engineer’s obsession around numbers and formulas. This means I suffer from an engineer or physicist’s belief that everything can be neatly quantified and turned into a life changing equation. It’s a fool’s errand to create a catholic system because it’s impossible to fit everyone’s needs. What I’m going to describe here is what worked for me. In the words of my wife “I’m a stubborn mule”. Once I have a plan in my head, I get to work and keep going until I fall over.

My diet worked for me – it might not work for you. There are multiple ways to lose weight and different approaches work better for different people. And do I even need to remind you that making big health/lifestyle changes should be reviewed by an actual medical professional first? This goes double if you have any sketchy health issues. Remember, a diet is intentionally stressing on your body’s systems. Don’t play fast and loose with them!

How to Lose Weight in 4 Easy Steps

Here’s the core of what I did:

– Tracked my calories on my phone using the MyFitnessPal app

– Made sure the things I ate fit inside those limits.

– Walked 2-5 miles per day.

– Be consistent. Nothing screws you up as much as not sticking to your plan.

That’s it. I wish there was a magic trick or a pill or something, because if there was I could be as rich as Croesus. But no, the heart of the matter was coming down to the decision to stuff less junk in my pie hole and work the weight off that way. You’ll hear people refer to this as Calorie In / Calorie Out (CICO). It’s simple; it’s old fashioned and these days actually practical to do with a few simple tools.

Counting Calories – A How To

In the pre-smart phone era, if you wanted to calorie count it was tedious, extraordinarily so. These days with any one of a handful of apps, calorie counting is a simple matter of typing or taking a picture of barcodes. I used the MyFitnessPal app, which ties in with all sorts of health gadgets and other apps to help track the impact of your daily exercise. Literally to use MyFitnessPal, you just type in what you’re eating, add a recipe or scan a barcode. The app helps you calculate how much you should eat per day (calorically) and helps keep a record of how you’re doing.

But that’s not all you need – a scale, well two, are handy. One is your traditional scale. Shed the clothes as comfortable and weigh yourself. Do it consistently, every day or every week at the same time. I prefer pre-coffee, pre-breakfast, pre-morning angst because that’s going to be as low as I go for the day.  Be consistent about it (a theme of this whole effort)

The second is a food scale of some variety. (This is the one I used)Using your hop scale is a great way to reset your picture of proper portions and you’re showing your partner that your brewery purchases can have greater utility. Why a scale? Because seriously – that scoop of delicious nutrition packed peanut butter? Many more calories than you think.

On the one hand, don’t worry about super precision down to the calorie level tracking – you’re playing a game of thousands, not ones. But on the other hand, measuring your food is important to help you know how to eat the correct amount.

Why not <Blank> diet?

These days lots of people swear by carb cutting. Low carb diets (ala atkins/keto/paleo) which work by short-circuiting the “normal” dietary metabolism in favor of ketosis. For some folks, these diets seem to work, but not for me so that’s why I didn’t use that approach.

I’m not a fan of restriction/elimination diets because I don’t feel they’re sustainable. Plus I get a little suspicious when a diet promises me no repercussions for all the bacon I can eat. At some point we all backslide and for many of the restriction diets, a backslide can throw your body out of the diet’s desired state of metabolical activity.

For many low carb diets that causes a pretty dramatic “instant” weight gain as the body creates new stores of glycogen from the influx of carbs. It gets bound with additional water for even more apparent weight gain. Plus let’s face it – from a brewer’s perspective – low carb and beer don’t play well with each other.

There are countless other diet plans out there like Glycemic Index diets that look to curb blood sugar changes by avoiding foods that drop a high amount of glucose into the blood stream or counter balancing carbs with relatively equal loads of protein. The diet basically works to curb hunger and over eating by preventing large swings in insulin production and blood sugar. Proponents also point out that the body will burn carbs before burning fat calories and when your goal is to drop fat, why interfere with it?

There’s still a lot of scientific debate rolling back and forth with different studies offering different evaluations of effectiveness, but again for some people GI diets work quickly and like a charm with other health benefits claimed.

Unfortunately, beer has a high glycemic index, which makes it difficult to incorporate with a GI approach without due diligence paid to balancing out the carb load. A fellow brewer swears by the diet, carrying cubes of chicken breast to competition to equalize his beer intake. He’s lost a bunch of weight following this plan, but even still when he’s in hardcore mode, he still prefers spirits for their lower hit. Remember – different diets work for different people!

One advantage of old fashioned dieting; if you backslide, you take your lumps and go right back to it. No keto flu, no carb cravings, etc. Just accept the “slip” and move on. Remember consistent application of principles will get you there.

What I Eat (Including Recipes!)


An Imperfect, but better than usual Valentine’s Day meal – sauteed spinach, seared scallops on a bed of orange cauliflower puree and a beurre blanc sauce – a little healthy, a little cheaty.

Important thing to know – I love to cook and I love to eat. So what the heck do I eat now that I no longer have a free hand with the olive oil jug and the cheese? Is it all just vegetables? No, but there are a ton more veggies in my diet now than used to be!

My daily goal is to get 50% of my calories from carbohydrates, 30% from protein and 20% from fats. Again, using a tracking app makes it super easy to know if you’re there. Important to note – as much as possible, I avoid large amounts of simple carbs aka refined sugar, sugar syrups, bleached flour, pasta (sob) and less complex breads. These have a tendency to make me hungrier possibly from blood sugar effects (see glycemic index above). I just don’t tend to feel as full or as happy after them so, nope.  Also, let’s face it, I’m drinking beer and other fun beverages while dieting and that’s enough stupidity to not add to it.

I simplified breakfast by almost always eating the same thing. I make a breakfast sandwich based on a whole wheat English muffin, egg whites, a little cheese and some flavorful protein source like smoked salmon. Lunch is a salad or veggies with lean protein – aka chicken breast. Dinner is something tasty, but still light – my turkey chili; a sweet potato topped with tomato sauce, turkey Italian sausage and mozzarella, a veggie burger, a BLTA, fish, shrimp, etc.

My focus is almost always on a lean protein with a spicy condiment and a bunch of fibrous vegetables like kale or zucchini. I don’t have cholesterol issues so I eat a mountain of shrimp cocktail because fancy and tasty. Remember spices are your friends! Here are a few of my favorite palate saving recipes:

A Typical Diet Day:

6:30AM: Cold Brewed Coffee (about a pint. Don’t talk to me until consumed)

7:00AM: New Yorker McMuffin

10:30AM: Celery/Carrot Sticks/Sugar Snap Peas (or a protein bar on lifting days)

12:30PM: Slow Cooked Buffalo Chicken Wrap with salad

2:00PM: Greek Yogurt

4:00PM: Granola/Kind Bar/Turkey Jerky

6:30PM: 5 oz. roasted salmon filet, zucchini noodles, and sweet potato

8:00PM: Frozen Yogurt Bar

10:00PM: Chocolate Covered Almonds

12:00AM: Sleep

New Yorker McMuffin

~200-300 calories

1 Whole Wheat English Muffin (Double Fiber even better to stay full)

0.75 oz. goat cheese

2 thin slices yellow onion

A handful of capers

1 oz. smoked salmon

4 oz. Egg White Substitute, scrambled with cooking spray

Salt

Black pepper

Dried thyme

Squeeze sriracha, if desired

Pickled peppers, if desired

– Toast the muffin, spread with goat cheese.

– Top cheese on one side with half the onion, scatter the capers on there and top with salmon

– In a non-stick skillet, scramble the egg white and spices briefly before letting it set into a sheet. Fold it and let brown slightly.

– Add egg on top of the salmon, top with the other part of onion and pickled peppers, if desired

I also do this with Canadian bacon or turkey bacon or turkey sausage and cheddar (1/2 oz.) and no capers for a variation

Chicken Sausage Kale Bowl
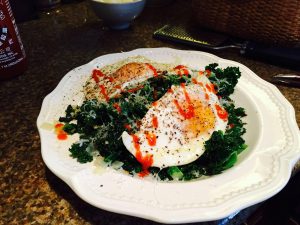
~300-400 calories

This is tasty and good for you, plus the kale does a great job filling you up. Shut up, I know Kale. Give this a shot – you’ll actually enjoy it.

1/2 medium yellow onion, diced

2 cloves garlic, minced

1-2 links Chicken Sausage, diced

5-6 oz. cut, cleaned Kale

Splash olive oil

Splash balsamic vinegar

1 egg, sunny side up

1/2 oz. grated Parmesan

– In a skillet, spray with a little olive oil mist. Add onion with a pinch of salt – sweat the onions until soft. Add the garlic and stir until fragrant. Add the chicken sausage and brown.

– Add the kale to your skillet, stir it around to get coated and then cover the pan and let the kale wilt for 5-10 minutes or until soft, but not mushy. It should have wilted into a dark green tangle

– Add the olive oil and vinegar and toss the kale to coat.

– Serve in a bowl topped with the egg and Parmesan and some hot sauce to boot.

Zucchini Turkey Sausage Lasagna

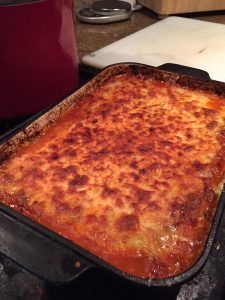
Makes 6 servings in a 9×13 pan – because they lie when they say “8 servings” No one eats 1/8th of a 9×13 pan of lasagna without feeling a pang of regret and nibbling off small pieces with a fork.

Approximately 420 calories per serving. (Compare that to traditional lasagna which has something like eleventy billion per slice – and you eat two of them)

“Noodles”:

3 largish zucchini, sliced into planks on mandoline, salted liberally on paper towels. I use the second thickest setting on the mandoline to get sturdy slices that don’t fall apart but also don’t dominate the meaty cheese goodness.

Sauce:

1 onion, diced

4 cloves garlic, minced

3 links hot Italian turkey sausage

1 tbsp. tomato paste

10 oz. crimini mushrooms, chopped

1 big can crushed tomatoes

2 oz. vermouth/wine

1 tsp oregano

Cheeses:

12 oz. part skim mozzarella, shredded

12 oz. ricotta

1 egg

1 oz. grated Parmesan

Instructions

Preheat oven to 350F

Noodle Prep

Prep zucchini and let salt do it’s magic for ~20 minutes while you assemble the sauce.

Sauce Prep

Sweat onion over medium-high heat with a little olive oil (or spray oil) in your saucepot with salt. Get translucent. Add garlic, stir until fragrant with salt. Remove sausage from casing; break up into wee little pieces in the pot. Sauté until no longer pink. Add tomato paste to pot and stir until no longer bright red and threatens to burn. It’s flavor, shut up. Add chopped up mushrooms with so much salt. Cook for 10 minutes until mushrooms release moisture and moisture goes bye bye. Add tomatoes. Rinse can with wine and add to pot. A little booze actually helps release flavors otherwise not available. Simmer until thick – 20-30 minutes.

Noodle Cook

Now that zucchini has been sitting a while, dry with paper towels. Place onto baking sheets lined with silicone mats or parchment paper. Bake for 15 minutes. Pull and allow to cool.

Lasagna Assembly and Cookery

Mix the ricotta and egg together with some salt and pepper. Set aside

Take a 9×13 pan, I use an enameled cast iron because heavy is good. Add a layer of sauce to bottom of pan. Lay in half the “noodles” and top with more sauce. Add most of the ricotta mixture. Spread it around. Add 1/2 the mozzarella.

Layer in more noodles. More sauce, the last bit of ricotta, the other half of mozz and then sprinkle with the Parmesan on top.

Put 9×13 pan on a cookie sheet and bake for 35 minutes in the middle of the oven. Turn the broiler onto low and broil for 5-7 minutes until the top is so, so gloriously brown.

Pull for the oven, wait 15 minutes to avoid burning the hell out of your mouth.

Turkey Three Bean Chili

Makes 8 giant servings – roughly 350 calories per serving (without cheese or other condiments)

1 large yellow onion, diced

6 cloves garlic, minced

1 container extra lean ground turkey (20 oz.)

2 tablespoons cumin powder

2-3 tablespoons chili powders (I mix several homemade together)

2 cups water

2 oz. Tequila

28 oz. can Crushed Tomatoes

15 oz. can Fire Roasted Tomatoes

15 oz. can Lower Sodium Pinto Beans

15 oz. can Lower Sodium Black Beans

15 oz. can Lower Sodium Red Kidney Beans

14 oz. smoked Turkey drumstick, meat stripped and roughly chopped

Cilantro to taste

– Spray down a large Dutch oven and heat over medium heat. When hot, add the onion and a big pinch of salt. Stir and cooking until onion is translucent. Add garlic and allow to get fragrant – 30-60 seconds.

– Add the ground turkey, stirring to break up into small pieces. (With meat this lean, I prefer small pieces to avoid a tough chew). 5-10 minutes

– Once the turkey is no longer pink, add the spices and heat them through in the turkey juices. Add 1 cup of water and let the water bloom and boil – turn your spices into a spice slurry. Repeat with the second cup of water and then finally with the tequila. Your pot should be filled with an aromatic punch and a bunch of turkey and onions.

– Reduce the heat to low and stir in the tomatoes, beans and smoked turkey. Add a few roughly torn up sprigs of cilantro. Let simmer for 45 minutes or until the tomatoes no longer taste “tomatoey” and the chile and cumin flavors shine through

How to Eat – Snacks and On the Run

A good thing to figure out about yourself is how you like to eat. Turns out I like to have constant stimulation and so for me it worked out that I preferred having the ability to grab a snack on regular basis along with smaller main meals. Gotta track the calories though!

Snack Foods

– Turkey Jerky

– Nuts (I particularly love chocolate covered almonds – careful though nuts are calorie dense)

– Greek yogurt with some variety of fruit mix in

– Carrot/Celery sticks/sugar snap peas

– Water crackers and cheese/hummus/nut butter/yogurt spreads

On the run eating or eating out is another challenge because we don’t always have kitchen access at the ready. My best plan for eating out has always been to make up my mind before hand. In other words, say unto myself before entering that restaurant “we’re going to look for a nice piece of fish or chicken and ignore the pizzas and pastas that we want to bury our face into”. That little mental exercise is enough to give me the extra mental clarity to make a more dietically friendly choice. It’s not perfect – sometimes the gooey nature of an artichoke spin dip overrides my sense, but that’s the way it rolls.

The other important tip about eating out – don’t eat all of it. Restaurant portions are insanely huge in this country – usually 2-3 times appropriate single meal sizes. Some people ask the waiter to box half the meal when they order, but my sense of social propriety makes that untenable. Instead, eat slowly and sensibly, stop and let your brain catch up to the body’s signals of satiety.
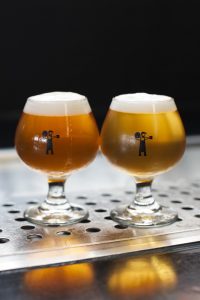
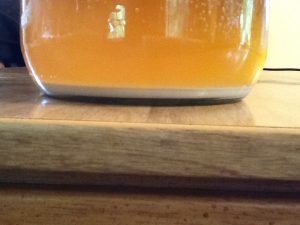
Beer on a Diet

Here’s the part you wanted to know – can you drink on a diet? Turns out that the answer is yes, but carefully. I limited my drinking for the first two months of my diet. Part of it wasn’t hard – I still wasn’t feeling well. I pretty much only drank at club functions and even then didn’t drink at our board meetings. Slowly, I incorporated more drinks over time as I felt better and fitter. But – most importantly, I fit the beers into my daily calorie count.

Take a look at that “daily diet” day. On days when I’m at a club meeting or festival, the number of snacks decreases. The meals become leaner – chicken instead of salmon. More veggies and skip the sweet potato and dessert. That’s how I do it.

The hardest part about drinking – avoiding two voices – the voice that says, “You know what sounds like a lovely idea? Another drink!” and the other voice that says “hey, I could really go for a large double cheese double meat pizza.” The first, the “grog monster”, is easy to avoid if you can make a plan and stick to it.

The second is harder because that voice is your body’s natural reaction to drink induced blood sugar drops. In a nutshell – alcohol consumption causes fluctuations in insulin and blood sugar levels. When your blood sugar crashes thanks to increased insulin, your brain fires off signals that you receive as an emergency bat signal for immediate food consumption – the more caloric, the better and naturally the worse for your goal of losing weight. If drinking is taking to excess, this can get rather dangerous, but for your garden variety having a couple of drinks – don’t listen to it or at least grab a healthy snack instead of that giant tray of mini bagel pizzas you see.

But, but… looking at the Internets many craft beers fall into the realm of 200-300+ calories per serving. How the heck am I going to fit all of those into my daily regimen and still eat food? A strategy you can use, and many people do this to incorporate “cheat days” is to use “intermittent fasting”. Plan ahead – if you know you’re going to a beer festival on Saturday, increase your calorie deficit during the week by 100-200 calories to give yourself a little extra room on Saturday. You’re basically lending yourself calories to use. Remember what I said about cheat days? Well, there you go – beer days are my cheat day – kinda.

Oh and be careful! As you lose weight, the amount of alcohol you can safely consume (in terms of intoxication) drops. On the one hand, your bar tabs will go down since you’re no longer downing four pints of 10% beer. On the other, you’ll need to keep a better eye on yourself and remember things like cabs, Uber/Lyft and designated drivers. Heck, wouldn’t hurt for you to be the DD for your friends for a bit!

Exercise – How, What, When and Why Not to Push It


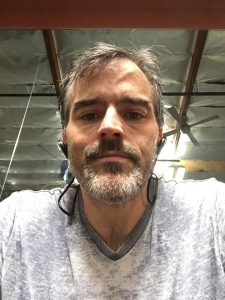
The Only Gym Selfie I’ve Ever Taken – As Far As You Know

Astute readers will notice I’ve only said one word about exercise and that’s “Walked”. Most people desirous of weight loss go all in. They get gung ho about their resolution to lose weight and start dieting and hitting the gym at the same time. Gotta burn up those calories after all and make up for lost time.

It’s a natural reaction, but I feel like it’s a formula for failure. Why? At least for my personality, this whole weight loss thing had to start with me re-training my food habits that trying to add exercise to it would have been overwhelming.

Exercise is good and it’s a key to getting truly healthy. Adding exercise, particularly strenuous cardio, will burn calories, but it also will ramp your appetite at a time when you have to deal with the first throes of “Can’t eat all the stuff I used to eat” syndrome. That’s sounds like a perfect storm of “I want to eat” desires at a time when you’re trying to ignore them.

After my first month of dieting, I started simple. I took my army of Chihuahuas on a daily walk. At first it was just around the block, every day before work. At work, I walked around my office building at lunch. Gradually, I added distance. The morning walk grew to 2.5 miles with some very exhausted dogs happy to sleep for the day. The work time walk grew to encompass the whole lunch break pushing up to 4 miles. Did the dog walk every day. Longer walks 4 times a week. Eventually I even bought a pair of proper shoes to do a little light running. For the vast majority of this project, this is all I did for exercise.

Depending on your physical condition, exercise can put you in a worse position from a weight loss perspective. You go for a jog, twist an ankle, get discouraged and then start to backslide. If you’re not prepared for it, the backslide can become permanent.

A mental obstacle I tripped myself up with for years is “exercise reward” thinking. That’s the little voice saying, “Dude! You rocked that treadmill today! You crushed those weights! You must have burned eleventy thousand calories, look at the machine’s counter! You deserve a reward of a nacho pizza cake!” (Goggle “nacho pizza cake” to shake your head at humanity’s waist)

It’s a fool’s errand to listen to that voice. He’s wrong for several reasons. First, no matter how many sensors you’re using, anything telling you how many calories you’ve burned is going to be woefully inaccurate and can lead you into the delusional garden of exercise eating.

Secondly, Penn Jillette, the loquacious half of Penn & Teller, lost a bunch of weight recently and developed the motto of “You can’t outrun your mouth”. While I disagree with some aspects of his diet plan (which is extremely low calorie), I whole-heartedly agree with his motto. Unless you’re training like Michael Phelps, exercise alone isn’t going to compensate for a diet of Double IPA, double cheeseburgers and double pieces of pie.

Having said all of that – as I approached my final goal weight – 170 – my weight loss slowed. Gone were the days of losing 2 lbs. a week while eating 1900+ calories. I needed more exercise and that’s when I think you want to bring in the big guns, the strength training. Adding muscle does wonders for keeping calories at bay. It also requires more calories, preferably “clean” calories to keep building, which is what makes it tricky – more food means more possible weight if you stop working out.

Now my weekly routine consists of a full body strength routine three-four times a week with a circuit training class plus walking/jogging the other days. When I’m in the gym I simply do squats, overhead presses, deadlifts, rows, lunges and bench presses. That’s enough to get you started on the right course! Every day I try to do a little something for the mechanical system of my body.

How My Diet Went

Here’s the breakdown so you’ll know what to possibly expect. You’ve seen the front photo. I’ll drop some additional progress photos after this.

In my first month of dieting, including the time I was sick – I dropped 22 pounds. It’s insanely fast, but that’s the body getting rid of the excess water as well as fat that you’re carrying. It’s easy and amazing to watch that happen with just a little focus – but beware the “woo hoo! celebrate” messages in your head. As time went on, the monthly totals dropped – as they should. The second month, I lost another 12 pounds. By month five I was down nearly 60 pounds – over half way to my goal.

Actually, here’s a word about goals. I started this diet at 270+. My initial goal – the marker I set my sights on – was 200. Let’s get there! As time went, I adjusted my goal when I saw that I could still do it and had room to improve. Eventually 200 became 190; 190 became 174 to get to a healthy BMI (Body Mass Index – a ratio of height to weight) target for my height and then finally 174 became 170 because even numbers rock. Now my goal is to stay around there and enjoy life while being in a better space physically and health wise!

Eventually, I got to my healthy BMI target (174) in October – 9 months after starting. It took another two months after that to reach my final goal of below 170. (100 lbs down!) It happens.

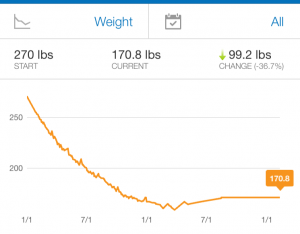
If you look at the graph of my weight loss, you’ll see that flattening of the scale. At first it’s easy to lose weight because your body needs a lot of calories. When I first started at 270, I could lose weight eating close to 2000 calories a day – that’s a lot of healthy food! Before I got more exercise incorporating, my restricted target was closer to 1500 calories per day – a much tougher goal.

Those bumps in the graph – those are completely normal. Some are tied to events like going wine tasting, visits from family, the AHA conference or travelling, etc. Some aren’t. Some are just the normal day-to-day fluctuations of your body mass. Don’t let an upswing get you down – particularly if you’re exercising or having a respite from the diet, but don’t get complacent!

Here’s an important tip if you have a long slog ahead of you – take some pictures. You’ve seen mine in this column showing my face. There’s a set of pasty puffy white shirtless dude as well – but those aren’t releasable on the orders of the Federal Government for the safety of society. Additional things to track – particularly when you get to the end of your journey and things become less about the number on the scale and more about other changes – get a measuring tape and learn how to take tailor measurements. You’ll be surprised at how many inches seem to disappear even though your weight stays the same. (Hello tricky fact that muscle mass weighs more than fat!)


February 2015 – 1 month in


April 2015 – 3 months in


June 2015


August 2015


October 2015 (I couldn’t fit into this shirt when the guys in Brazil originally gave it to me!)


December 2015 – Almost 1 year since the “good” photo

Life on a Diet

Back to our most important lesson – a diet as a “period of weight loss” is a terrible concept. It dooms us into this world of privation where we see a ticking countdown clock or a finish line just ahead that welcomes us back to a land of plenty. If you’re like me, being in a land of plenty with no restrictions is what got me into trouble in the first place. Instead, let’s focus on “diet” as a means of eating in a healthy fashion.

This also means you have to remember to live life, even while dieting. During my weight loss quest I went on several brewery trips, went to Brazil where I gave myself the meat sweats and drank cacahca and capharinas in the jungle, epic wine tastings, holiday meals, conferences, etc. Probably should have enjoyed a few more special meals with my family, but that’s my stupid laser beam focus kicking in. Try to live your life and recognize that things are meant to be experienced not just lived “correctly”.

Please remember, you’re bound to screw up. You’re going to have that extra beer, ice cream, pizza, nachos, duck fat fried French fries with aioli, etc. Then, if you’re like me, your brain will kick you in the metaphorical shins with demotivational words about your loserdom, which naturally activates that “sad eating” impulse. Take a page from the recovering folks at Anything Anonymous (hey, there’s an Overeater’s Anonymous!) – this is a one-day at a time effort. Leave the guilt in the confessional and keep working your program! You’ve got years to screw up and correct your mistakes!

Life Post Weight Loss

The dramatic part of my weight loss journey stopped in November of 2015 when I hit 165 lbs., down from my initial weight somewhere north of 270. In that time, I went from squeezing into size 44 “relaxed” jeans (at a waist size in excess of 50”) to “slim” size 32’s (waist- 35”) and from super tight XXL shirts to mediums.  The truly terrifying number – I went from over 50% body fat down to ~18% – aka back into healthy range! Over time I’ve added muscle and dropped the body fat down to 14%. Currently, I’m up a little (172ish) because I’ve been injured and out of the gym, but we’ll correct that soon!

I still track my calories because it’s good to keep things honest and understand my caloric needs and how I’m doing.

And here’s the thing – this time is the hard part. Losing weight was annoying, but exciting and motivating as I could see progress before my very own eyes. There were plenty of congratulations being passed around once I lost 40 lbs. and people decided it was ok to comment and praise me. Those changing wardrobe sizes felt rad everywhere except my wallet. Even writing this article is a bit of an ego boost.

Now I’m in a world where the praise doesn’t come easy and the fight is one to maintain stasis. It’s not as sexy and rewarding and it’s a longer slog. But here I am now and I intend to stay somewhat here. I’ve set a line in the sand – if my weight moves back above a certain threshold, it’s back to business. Until then, just gotta keep fighting and resisting the seductive draw of the “easy” – the pizza, the cheeseburgers, all the fried goodies and  “ahh, screw it, I’m too tired to cook let’s eat out”.

Let’s make a deal shall we? Let’s see where we’re at in a year and congratulate each other then for our success in either losing or maintaining. Just remember, we may not get to all the beers this year, but we’ll be in better shape to get the beers of the future!

Quick and Dirty Science – Steel Cut Oats

TLDR – Lord You Talk Too Much Drew – Executive Summary

It looks like no, Steel cut oats don’t necessarily need to be pre-cooked to use in a mash, but judging by the results I saw – it still helps.

For Those Who Like To Read

I am a huge fan of oats in beer as listeners of the podcast will discover shortly. I tend to use them in a lot of places, because why not. It’s probably because I’m part Scottish or something. (honestly family lineages are so screwy who can tell)

Anywho.. digressions aside. The second episode of the Brew Files – The Crushable Cream Ale, led to me getting tagged on a Facebook homebrewing post about steel cut oats. (Homebrewers Roundtable is a closed group, so you’ll need to ask to be a member of the group.)

Namely, can they just be mashed like normal or should you cook them first? I got tagged because listener Paul Galardy suggested – “maybe they should be cereal mashed and you can hear Drew drone on about it here” (Paul was nicer than my editorializing!)

The question comes – well, the tables that are out there say oats gelatinize at temps lower than mash temps (~125-144F) Basically for oats, that’s the range in which the starches bust out of their cages and go racing free into the soaking liquid. Different cereal grains gelatinize at different temps. You can see from the photo I borrowed from Adam, oats, rye, wheat all happily gooify below saccharification temps. Corn and rice, on the other hand, do not. So that’s why when we talk about Cream Ale (or American Light Lager), you have to talk about pre-cooking the grain.

But not all grain types are equal. I would bet good money that the majority of people think of oats as looking like this.

Those are flaked oats and they’re versitile and wonderful to use. Big thing about flaked grains in general – they’re already gelatinized – hit them with hot water and the starches are free to disperse. That’s why so many brewers will use flaked corn or flaked rice. Less work!

But steel cut oats are a little different, they’re little pieces, but they haven’t been pre-cooked and when made for breakfast, they take a good long while to cook. Is a regular mash hot enough and long enough to hydrate the cereal and get the starch into solution to be enzymatically transformed to sugary good times? See what they look like? (For more information about oat forms – check out this kitchn article)

Steel Cut Oats – Plus Look 20+ years later and sexy knife scar still on the pinky!

The “Experiment”To answer the question at hand, I set up a quick and dirty experiment – two mason jars, 1 sous vide circulator, 1 quart water per jar and ~0.8lbs of domestic 2-row and oats split 50/50. This would put us close to the traditional 1.25 quarts/lb mash ratio many homebrewers use.

Process

Seems so ridiculously tiny, but there you are one pound of Great Western 2-Row
Grind The Barley.

I ground a pound of barley through my lovely MM3 mill to produce a nice even crush.

Crush Your Barley!

Weigh In:

I weighed out 6.4 oz of two row and oats for each jar. This 50/50 ratio is well above what all but the most fool hardy brewers would use, but what the heck. Let’s push this

Weighing in at 6.4oz – The Main Show – US 2-Row

And in this corner – 6.4 oz of Steel Cut Oats
Pre-Heating Jars

When the dumb idea occurred to me, I grabbed my half gallon mason jars, added one quart of water and threw them into a Cambro with my Anova circulator (newer model in link, my old one is discontinued). I set the circulator to 152F and walked away for an hour to let the jars and water heat through.

The Soak

With the water at temp, I mixed the grist into the water and let it soak in the warm bath. Now this is arguably the tactical error I made with the setup. The grains dropped the temps into the high 130’s. To compensate, I let the jars run for 2 hours in the water bath. The first hour was all a slow ramp to 152F and the last hour was the “mash rest” for conversion. Turns out this is about as ideal a scenario as you could get for hydrating the steel cut oats. (Next time, I’ll heat the strike water separately and then dose into the pre-heated jars.)

Time and Temperature Doing It’s Thing

Play with the Hugo While Waiting for the Sciencing to Resume
The Lauter

Take one fine mesh strainer, one giant Rubbermaid pitcher and strain. Each set of grain was allowed to drain. I let the wort drain for about 10 minutes after which we’d collected at least a pint of wort. (In theory we should have collected about 1.2 pints per sample, but I wasn’t being finicky here.)

High Tech!
The Settle

I decided it was best to let some of the massive protein charge in these worts settle first before taking a sample. Oats sure do throw some gunk don’t they. Interestingly that even after an hour, the flaked oats were still messy as all get out. For the record, yes, the fine mesh strainer is a coarser separation mechanism than our usual gear.

After lautering both. The Steel Cut on the left has a 10 minute head start, but it’s clarity was always leaps and bounds. See next pic

One Hour Later – Steel Cut on Left is still much, much clearer
The Tests

I decided to subject the samples to four tests.

  • Mash Taste Test: How did the mash taste? Sweet? Dry?
  • Iodine Starch Conversion: Was there free floating starch in the wort. (The iodine test isn’t exact, but it’s a good rough measure)
  • Original Gravity: How much sugar did we get?
  • Wort Taste Test: How did the wort taste?

The Results:

Steel Cut Oats:

  • Mash Taste: Oats themselves are soft, but still with a bit of tooth. Some noticeable sweetness left in the mash. Remove the barley husk from this and I could totally see this being a Scotsman’s breakfast. (I would seriously eat it)
  • Iodine: The test showed complete conversion and with the wort being clearer, there was no confusion to the readings – iodine went in iodine colored and stayed iodine color
  • OG: ~15.2B (aka 15.2P), compared to the theoretical max of 27.5P means we gathered to the wort ~55.3% of the sugar. This is less than the Flaked (see next section) Makes me a little worried about the overall extract.
  • Wort: Wort tastes very oaty with a hearty mouthfeel and clean nutty component. Definite impact from the oats on the overall character. Would definitely enjoy this in the morning. Might be the ultimate Hot Scotchy.


Contact! Iodine Stays Iodiney (Even after swirling and mixing)

Some days my refractometer photo game is on point. This was not one of those days Steel Cut – reading about 15.2B
Flaked Oats:

  • Mash Taste: This mash was total mush. The oats had no residual presence having just dissolved away. The mash itself was mostly bland, lacking sweetness, indicating it had moved into the wort.
  • Iodine: The test showed complete conversion, though the extra material carried into the wort was causing some color change that eventually settled back to dirty iodine color
  • OG: ~18B (aka 18P), compared to the theoretical max of 27.5P means we gathered to the wort ~65.5% of the sugar. Not too shabby.
  • Wort: Much, much sweeter than the steel cut. The body is much thicker, more viscous. Feels like an old English nursemaid’s recovery drink “Beechum’s Barley Oat Tonic Revitalizes Your Sapped Spirits. Now With Radium for Extra Pep!”


Muddier, but still iodine color (the blotch of purple in the upper corner did fade back)

That’s no horizon, but it’s a lot higher than the steel cut!
Conclusions (aka Finally you get to the point you rambling so and so.)

Ok, so it’s fairly clear that we get extract when using steel cut oats raw in a mash. Even in this dirty test we see the grain softened and starches released. Now, this was also the best case scenario – the oats had a nice long (120 minute) mash, but a good portion of that was the ramp up to saccharification, so the soak would have been slower.

Does this mean I feel comfortable saying “eh, just go and throw your steel cut oats in the mash”? I’m going to say “maybe”. I think there was a fair amount of extract left in the steel cut  compared to the flaked. This leads me to say that if you want a better guarantee of full extract from your steel cut oats, you should probably still cook them first just to give everything a head start.

The steel cut wort was clearer, but I’m not certain that’s going to matter with a proper mash with proper lautering, boiling, chilling and then a whole cycle of fermentation and racking. Besides isn’t oat haze part of all the rage these days?

What was also nice to see was just how much impact the oats had on the worts. If you’ve ever doubted oats were doing anything at the usual brewer’s addition rate of 5-10%, 50% will definitely convince you that there’s an impact.

What do you think? Any ideas for other “quick and dirty” science things we can perform? I did this in a single afternoon because it bugged me I didn’t know the answer.

Where All This Began In a Photo

This is the magic secret photo – I’m not quite certain but I believe this index card is from around 2008. Back then I was working with fellow brewer, now turned Motor Trend star, Jonny Lieberman on a few beer concepts. I don’t remember the circumstances, but I sat down and wrote out a list of experiments that would be fun to explore to build up brew knowledge.

The card got filed away. Jonny became a car authority with a much more amusing life.

A few years later, Experimental Homebrewing  became a project and the first time that Denny and I worked together on something this massive. By that point, I had completely forgotten about this card. It was lost in a shuffle of papers in a cubby hole in my desk. About halfway through the project, in one of those fits of “cleaning and organizing is more fun than writing!”, I found the card and it was funny, because a number of these experiments were already written for Experimental Homebrewing! They must have stayed locked away in the recesses of my mind, fermenting and waiting for their debut.

Always fun to find artifacts of the the past!

The Pegu Club Cocktail

After Van Havig of Gigantic Brewing mentioned his love of Gin, we talked about some favorite preparations. You can hear him describe in Episode 29 the Pegu Club Cocktail – the house cocktail of the British gentlemen’s club in Rangoon. It’s super dangerous and really easy to drink

Here’s what I’ve been making:

1.5 oz Gin

0.75 oz Cointreau/Tripel Sec/Orange Curacao

0.25 oz Lime Juice

1 dash Aromatic Bitters (e.g. Angostura Bitters – I use Scrappy’s)

1 dash Orange Bitters (I use Regan’s)

Shake with crushed ice for 15-30 seconds to make ice cold. Strain into a chilled cocktail glass.

Some versions up the amount of gin to a full 2 oz and even increase the lime juice to a full 0.75 oz, but I think that’s a bit too much lime.

The Saison Files – Tasting the Saison Strains of the Yeast Bay

Less Talk – More Yeast Writings

So you know I’m a Saison Nut, right? It’s the style I’m known for more than anything else. It’s the style I brew more than anything else. It’s playful, expansive, complex and approachable. The style has allowed me lots of room to be creative. You’ve got my Year of Saisons, my “Your Farmhouse” Saisons, my hoppy Saisons, my Champagne Saisons, my Guacamole Saisons, my Chowdah Saison, etc, etc.

I’ve got my Saison Guide, which we’ve talked about a few times and it’s even inspired one of our experiments (and soon some more as well).

The hard part about the guide though is the yeast strain descriptions. I’ve slowly but surely been working my way through them but every time I turn around – more strains are added! This time out, I decided to capture my reactions to tasting three of The Yeast Bay’s Saison strain and answer a few questions at the same time. Enjoy! (And don’t forget to go listen back to Episode 5, when Denny and I interviewed Nick from the Yeast Bay.)

What do you guys think? Did you find the same results when you tried these strains? Is there a particular recipe you’d like to try with them?

AnchorThe Thirty Second Strain Summary (Full Notes of All Strains in the Saison Guide)

  • Saison Blend – (Tested June 2016) – Initial nose of apple and cinnamon. Lightly sulfurous to close out. As the beer warms, becomes an apple bomb. Spicy forefront with a little bit of a corny aspect. Strong finish of herbal tea and cinnamon. Of the three tested this is the closest to “classic” with an overall balanced approach on the palate. Would benefit from fermenting a little cooler, I suspect.
  • Saison Blend II – (Tested June 2016) – Clean nose that jumps into a grapey/winey sensation that becomes blended with sandalwood. Hops pop out of this batch more that the others. Mouthfeel is luxurious but not as “gummy” as the French Saison strains like Wyeast 3711 French Saison. The finish is bright and straight up clove/cinnamon phenol.
  • Wallonian Farmhouse – (Tested June 2016) – Threw a lot of yeast on transfer. Had to work a little harder to get a clear pull. Initial hit on the nose is tropical fruit – hot spicy caramelized pineapple – think Upside Down cake. Palate is bone dry with a traditional “musty” earthiness that hangs through the mid palate until the spices hit in the finished with a bit of surprising tartness. (This is the only one of the three tested to actually really pop a tart character).

Confessions of a Yeast Abuser

I have a confession to make…I am a yeast abuser. And I have been for years. Yes, I know all the “rules” and try to follow them, but sometimes I fail and resort to….yeast abuse. Recently I brewed a batch of my Rye IPA recipe on my Zymatic. Looking in the fridge, I saw some WY1450 with a date of June 26, 2015….10 months old. I thought “I could make a starter with that”, but then I thought “Damn, that would take effort”.

I simply took it out of the fridge and smacked it to see if there was anything left alive in there. Sure enough, the pack swelled. The yeast abuser in me was delighted….”hey, it’s only 2.5 gal. of a 1.065 beer….that should work without a starter!”. I know, I know….yeast abuse.

After the beer was done, I sanitized the smack pack, cut off the corner and poured it in. The wort was at 63F. I was nervous, but had faith in my laziness.

When I checked the beer 24 hours later, nothing.

24 more hours and still nothing.

About 12 hours after that, I saw the first signs of fermentation and thought “good enough”.

12 hours after that there was a huge krausen that had formed.

After a week-10 days, I opened the keg I was fermenting in and saw that the foam had dropped quite a bit, but was still there. Took a gravity reading an got 1.030….damn, too high. Let it go for another week.

Yesterday I noticed the foam had completely dropped, so I crashed the temp to 33F. Took a gravity reading and it was 1.013…exactly on the money for a FG for that beer!

Poured the gravity sample into a PET bottle, put on a carb cap, and hit it with 30 psi. After 45 min. in the freezer, I had a cold, carbed sample to try. And it was delicious….perfect….exactly what that beer should be. Yeast abuse had paid off again. Sure it took a bit longer to ferment than usual, but that seems to be the only downside.

The moral of this tale is that you should trust your experience. It’s great to know what the rules are, and I advise you to follow them until you have enough of your own experience to draw on. And once you do, go with it…trust yourself.

Try what seems to make sense to you, but in the end trust what you know to be personally true. And pour yourself a beer.

Have You Seen Ester?

Introduction

I remember back to when I brewed my first batch of beer. It seems like yesterday; however, over two decades have elapsed since that fateful day. Much in the world of home brewing has improved dramatically during the last twenty years. An improvement that comes readily to mind is ingredient quality. Those of us who were participating in the hobby during the first home brewing boom can attest to having to work with hops that were often brown and malt that was past its prime. Small-scale brewers used to receive macro brewer cast-offs, and home brewers received the macro cast-offs that small-scale brewers rejected.

While poor ingredient quality and selection are a thing of the past, there are areas of home brewing that have changed very little in the last twenty years. One such area is an understanding of fermentation byproducts. We have transitioned from a hobby with an incomplete understanding of fermentation byproducts that fermented at room temperature to a hobby that uses temperature-controlled fermentation chambers to mask our incomplete understanding of fermentation byproducts. The topics covered in this blog entry are fermentation byproducts and the role that they play in beer flavor.

Fermentation Metabolites

Brewers who are relatively new to brewing often treat esters and fusel alcohols (a.k.a. fusel oils) like they are the spawn of Satan. However, beer would not taste like beer without these compounds. In fact, suppressing the production of fusel alcohols and esters can often remove much of an individual yeast strain’s character, resulting in little to no change in flavor when changing yeast strains.

Fusel Alcohols

With that said, what are fusel alcohols? Fusel is a German word that translates to “bad liquor.” Another term for fusel alcohol is “higher alcohol.” Why are fusel alcohols referred to as higher alcohols? Well, the word “higher” refers to the fact that fusel alcohols contain more than two carbon atoms. If we examine the chemical formula for ethanol, we discover that it is most commonly written as CH2CH3OH. Another formula for this chemical compound is C2H6O, which makes it clear that ethanol contains two carbon atoms. Alcohols with more than two carbon atoms have higher molecular weights and boiling points than ethanol; hence, they are higher alcohols.

One of the most commonly encountered higher alcohols in brewing is isoamyl alcohol. The chemical formula for isoamyl alcohol is (CH3)2CHCH2CH2OH. The formula for isoamyl alcohol is often written as C5H12O. As one can clearly see, isoamyl alcohol contains more than two carbon atoms. In fact, another name for isoamyl alcohol is isopentyl alcohol due to the fact that the compound contains five carbon atoms. Another frequently encountered higher alcohol is isobutyl alcohol. The chemical formula for isobutyl alcohol is (CH3)2CHCH2OH. The formula for isobutyl alcohol is often written as C4H10O. Once again, one can clearly see that this alcohol contains more than two carbon atoms.

An alcohol that is often grouped in with fusel alcohols that is not a higher alcohol is methanol. The chemical formula for methanol is CH3OH, which is also written as CH4O. Methanol has a lower molecular weight and boiling point than ethanol. One will often hear the term “heads” used to describe the first condensate that is produced during alcohol distillation. This portion of the condensate is discarded. The reason being is that the heads are mostly methanol due to the fact that methanol makes the phase change from liquid to vapor before ethanol. Methanol is generally not a problem in beer because it exists at low levels. Methanol becomes a problem when we distill beer into whiskey, which is why one should stick with beer. Due to their higher molecular weights and boiling points, the true higher alcohols appear in the condensate known as the “tails.” Higher alcohols have an oily consistency, which is why they are referred to as fusel oils.

Esters

Okay, now that we now know that higher alcohols are alcohols that contain more carbon atoms than ethanol, what is an ester? An ester is the result of a condensation reaction between an alcohol and a carboxylic acid. A condensation reaction is a reaction where two compounds combine resulting in a new compound and a water molecule.

A carboxylic acid is an acid whose formula ends in COOH. Esters are responsible for a large part of what we describe as beer flavor, especially ale flavor. A carboxylic acid that is commonly found in beer is acetic acid. Acetic acid production is integral to the yeast metabolic cycle. Every beer drinker who has tasted German-style hefeweizen has encountered an acetic acid-based ester that is available at above perception threshold levels. That ester is isoamyl acetate. Isoamyl acetate is the condensation reaction between isoamyl alcohol and acetic acid.

As mentioned above, the chemical formula for isoamyl alcohol is C5H12O. The chemical formula for acetic acid is CH3COOH.


Condensation reaction for isoamyl acetate C5H12O + CH3COOH → C7H14O2 + H2O

The reaction shown above reads one molecule of isoamyl alcohol plus one molecule of acetic acid yields one molecule of isoamyl acetate plus one molecule of water.

Two other acetic acid-based esters that are commonly encountered in beer above perception threshold levels are ethyl acetate and isobutyl acetate. As one has more than likely assumed, ethyl acetate is the result of a condensation reaction between ethanol and acetic acid. It has the sweet smell of nail polish remover. Isobutyl acetate is the result of a condensation reaction between isobutyl alcohol and acetic acid. Isobutyl acetate smells like raspberries or pears.

Other carboxylic acids that are frequently encountered in fermentation are hexanoic acid and heptanoic acid. The esters that are most commonly found in beer that are condensation reactions between these carboxylic acids and an alcohol are ethyl hexanoate and ethyl heptanoate, respectively. Ethyl hexanoate smells like red apple. Many brewers who are new to beer sensory evaluation mistake ethyl hexanoate for another yeast metabolic byproduct that smells like apple; namely, acetaldehyde. Acetaldehyde smells like tart green apple. The reason being that if we oxidize acetaldehyde, we obtain acetic acid. Ethyl heptanoate is my all-time favorite ale ester. It smells like one of those grape lollipops that were often given to children by bank tellers and medical office receptionists when I was young. Ales fermented with the Young’s Ram Brewery strain usually contain high levels of this ester when young, which is why I refer to ethyl heptanoate as the British lollipop ester.

Factors Affecting Metabolic Production

I mentioned in my introduction that we have transitioned from a hobby with an incomplete understanding of fermentation byproducts that fermented at room temperature to a hobby that uses temperature-controlled fermentation chambers to mask our incomplete understanding of fermentation byproducts. Quite frankly, fermenting ales at low internal temperatures in order to avoid unwanted fermentation byproducts is treating the symptoms instead of the problem. While fermentation temperature cannot be be ignored, the role of genetics and wort composition in the production of fusel alcohols and esters are equally important.

Temperature

Fermenting at low temperatures slows yeast metabolism, and anything that slows metabolism slows growth. Most of the esters and higher alcohols are produced during the growth phase. Slowing metabolism reduces metabolite production.

Genetics

An important thing to understand is that ester formation during fermentation occurs within the cell wall with the aid of enzymes. An important ester production-related enzyme is known as alcohol o-acetyltransferase (AATase). As I mentioned in the blog entry entitled “Carbon Credits,” an enzyme is a reaction catalyst. A reaction catalyst is a compound that increases the rate at which a reaction occurs. There are actually two AATase enzymes; namely, AATase 1 and AATase 2. Yeast cells contain two genes that are responsible for encoding these enzymes; namely, ATF1 and ATF2.

Wort Composition

Other than yeast genetics, the most important attribute in ester production is wort composition. The carbon-to-nitrogen (C:N) ratio plays a major role in ester production. As I mentioned in my blog entry entitled “Carbon Credits,” yeast cells do not consume sugar, they consume carbon, which they attempt to convert into energy. Sugar is carbon bound to water. All-malt wort has a lower C:N ratio than does wort that contains adjuncts. The amount of nitrogen that is available after dissolved oxygen is consumed determines the amount of acetyl CoA that is formed during the growth phase. Acetyl CoA is formed by combining acetic acid with coenzyme A; therefore, more acetyl CoA translates to higher acetic acid-based esters. The least desirable of is ethyl acetate.

Surprisingly, the higher C:N ratio found in adjunct wort results in lower ester levels. Macro beer is maligned beyond belief within the home and craft brewing communities; however, the German brewmasters who were responsible for creating this style were nothing short of geniuses.

American 6-row and 2-row barley have higher protein levels than continental and British barley. Higher protein levels translate to higher nitrogen levels. The addition of adjunct reduces the aggregate nitrogen level of the grist, resulting in lower nitrogen wort, which, in turn, results in lower ester levels. Protein levels also play a role in higher alcohol production. Higher alcohols are formed when amino acids are metabolized via the Ehrlich pathway.

Finally, the type of sugar being metabolized plays an important role in the creation of higher alcohols, which, in turn, plays a role in ester production. Sucrose and fructose result in increased higher alcohol production, and so does glucose to an extent. Maltose metabolism results in considerably lower higher alcohol production than does glucose and fructose.

Applying Science to Beer Production

With this blog entry almost complete, how does one put this information to work in a home brewery? Well, as Denny Conn likes to say, “Wort wants to become beer.” This statement is absolutely true. What we are attempting to do by applying science to beer production is to gain a finer level of control over the finished product. There is no one size fits all approach to brewing. There are just too many variables involved in beer production to distill the process down into a repeatable cookbook process that works in all breweries with all styles and yeast strains.

Quality Ingredients and Proven Techniques

Due to lack of access to a fully-equipped quality control laboratory, home brewers work with an incomplete knowledge of their ingredients; therefore, one should start by selecting the highest quality ingredients available and applying brewing techniques that have stood the test of time. After the basics have been mastered and a considerable amount of data has been collected (i.e., a proper brewing log is a must), a brewer can start to alter the experiment one variable at a time while taking copious notes.

Adjusting Wort Composition

We know that the disaccharide sucrose and the monosaccharides fructose and glucose tend to translate to increased higher alcohol production; therefore, one strategy to reduce to higher alcohol production would be to avoid mash rest temperatures below 150F, especially when using high protein barley such as American 2-row. A second strategy would be to dilute the protein levels found in American 2-row with a low-protein adjunct such as flaked maize at the rate of 10% of the grist. I personally prefer to use low nitrogen continental and British barleys.

Selecting for Character

While ester production is bounded by higher alcohol and carboxylic acid production, yeast genetics play a significant role because enzymes are proteins and proteins are encoded via a genetically controlled process known as transcription. We can adjust wort composition and fermentation temperature regulation to control higher alcohol and ester production, but yeast genetics play the ultimate role in the production of these compounds. I always say, “One should pick a yeast strain for the task at hand instead of attempting to trick a yeast strain into performing the task at hand.” If a yeast strain is not producing the sensory profile given by a yeast supplier when used within the given temperature range, then one needs to examine one’s wort composition and/or ensure that one’s thermometer is calibrated. Temperature measurements should be taken as close to the middle of the fermentation vessel as possible.

Closing Thoughts

In the end, brewing is a continuous learning experience. Home brewers have the luxury of being able to brew without having to maintain a profit margin; therefore, one should feel free to experiment with wort composition, temperature control, and different yeast strains while fine tuning one’s brewery and brewing process.

Carbon Credits

Fermentation is an incredibly complex process that can be mind boggling at times. Brewers like to think of yeast as a microscopic lifeform that transforms the sugars found in wort into alcohol, carbon dioxide gas, and metabolic byproducts that add flavor to the final product. However, in reality, yeast cells do not consume sugar. Yeast cells consume carbon, which they attempt to transform into energy. Alcohol and metabolic byproducts are the results of an inefficient metabolic pathway. The topic of this blog entry is how yeast cells transform compounds collectively known as carbohydrates into energy. Brewers often hear the term “organic chemistry” used when describing fermentation. Organic chemistry is the study of carbon-based compounds. Sugar is carbon bound to water; hence, the term carbohydrate. All of the sugars found in wort are multiples of CH2O. The simplest sugars found in wort are known as monosaccharides. The monosaccharides commonly found in wort are glucose, fructose, mannose, and galactose. These sugars are also known as hexoses because they contain six carbon atoms. All of the hexoses share the shame chemical formula, which is C6H12O6. How the hexoses differ is in their linear form. The four hexoses commonly found in wort belong to two different types of simple sugar. Galactose, glucose, and mannose are aldoses. Fructose is a ketose. An aldose is a sugar that contains one aldehyde group per molecule. A ketose is a sugar that contains one ketone group per molecule. Aldoses differ from ketoses in the location of something known as a carbonyl group. A carbonyl group is a carbon atom that is double bound to an oxygen atom. The carbonyl group appears at the end of the carbon chain in aldoses whereas it appears in the middle of the carbon chain in ketoses. Ketoses where the carbonyl group appears at the end of the molecule can isomerize into aldoses. The carbonyl group in d-fructose appears at the end of the molecule; therefore, it can isomerize into an aldose. As we move up the scale in complexity from the monosaccharides, we discover a group of sugars known as disaccharides. A disaccharide consists of two monosaccharides bound by what is known as a glycosidic bond. The most abundant disaccharide found in wort is maltose. Maltose consists of two glucose molecules bound by a glycosidic bond. Sucrose is also a disaccharide found in wort, but to a lesser extent. Sucrose consists of a glucose molecule bound to a fructose molecule by a glycosidic bond. Another disaccharide that Saccharomyces pastorianus (S. pastorianus or simply lager yeast) can reduce to monosaccharides, but Saccharomyces cerevisiae (S. cerevisiae or simply ale yeast) usually cannot is melibiose. Melibiose consists of a glucose molecule bound to a galactose molecule by a glycosidic bond. What is a glycosidic bond? A glycosidic bound is a type of covalent bond. In the case of glycosidic bonds, the bond occurs when atoms in two different sugar molecules share what are known as valence electrons. A glycosidic bond is formed via what is known as a condensation reaction. The outcome of a condensation reaction is another compound and an H2O molecule. For example, as mentioned above, maltose is a disaccharide that contains two glucose molecules bound by a glycosidic bond. Maltose is formed via the following condensation reaction: C6H12O6 + C6H12O6 → C12H22O11 + H2O By the way, like the monosaccharides, all disaccharides share the same chemical formula. The chemical formula for a disaccharide is C12H22O11. The most complex sugars found in wort that affect fermentation belong to a family of carbohydrates known as trisaccharides. A trisaccharide consists of three monosaccharides bound by two glycosidic bonds. All trisaccharides share the chemical formula C18H32O16. The ability to reduce trisaccharides to simpler sugars is one of the attributes that affects how well changes in saccharification rest temperature affect final gravity. For example, maltotriose is the most frequently occurring trisaccharide found in wort. Maltotriose consists of three glucose molecules bound by two glycosidic bonds. One of the reasons why Lallemand Windsor leaves a high terminal gravity is because the yeast strain is maltotriose challenged. One way to offset this weakness is to rest one’s mash at a temperature of 65°C/149° or lower to produce an extract that contains a lower percentage of trisaccharides and dextrins. Many brewers refer to this type of wort as a more fermentable wort. If yeast cells can only use monosaccharides directly, how do they reduce disaccharides and trisaccharides to monosaccharides? Yeast cells perform this feat via the inverse of a condensation reaction. The process is called hydrolysis. The roots of the word hydrolysis are from the Greek “hydros” for water and from the Latin “lysis” for break apart or deconstruct. Together, these words mean break apart via the insertion of water, and that is exactly what happens. While breaking the glycosidic bond in a disaccharide is a one-step process, breaking the glycosidic bonds in a trisaccharide requires two steps. In the case of maltotriose, the first step involves breaking a maltotriose molecule into one maltose molecule and one glucose molecule. C18H32O16 + H2O → C12H22O11 + C6H12O6 The maltose molecule is then split into two glucose molecules. C12H22O11 + H2O → C6H12O6 + C6H12O6 Brewers who have delved into this area of fermentation have heard that S. pastorianus can use raffinose as a carbon source while S. cerevisiae can only partially metabolize raffinose. This limitation is due to the same limitation that prevents most S. cerevisiae strains from using melibiose as a carbon source. Raffinose consists of two glucose molecules and one galactose molecule. What happens when S. cerevisiae attempts to break the glycosidic bonds that hold raffinose together is that the raffinose molecule is split into one melibiose molecule and one glucose molecule. Unable to break the bond that holds melibiose together, this disaccharide is left undigested. Raffinose is lost during the malting of barley; therefore, it is absent from wort. The rate at which hydrolytic reactions occur is shortened by the creation of enzymes. Enzymes are reaction catalysts. A reaction catalyst is a compound that increases the rate at which a reaction occurs. The enzyme responsible for catalyzing the hydrolysis of maltose into two glucose molecules is called maltase. Enzymes are proteins, and proteins are encoded by cells via a process known as transcription. A cell’s DNA provides the blueprints for transcribing proteins. If one has ever wondered why different yeast strains yield different levels of attenuation given everything else equal, herein lies the reason. A yeast cell’s DNA controls the enzymes that can be encoded as well as the level at which the enzymes can be encoded. What happens after the higher-level saccharides are broken down into monosaccharides? Well, the yeast cell goes about performing something known as catabolization. Catabolism is a metabolic process where the yeast cells attempt to turn carbon-based compounds into energy. The primary catabolic process that occurs in yeast cells is called glycolysis. Once again, we see a word that ends in “lysis;” therefore, we know that this process involves the breaking apart or deconstruction of a compound. In the case of glycolysis, the compound is glucose. Glucose is the primary monosaccharide found in wort. It is also a building block for the most common disaccharides and trisaccharides found in wort. The goal of glycolysis is to turn glucose into a compound known as adenosine triphosphate (ATP). ATP is the fuel source for a cell. The transformation of glucose into ATP in the less efficient anaerobic metabolic pathway results the production of ethanol, higher alcohols, diketones, and organic acids. We can look at these metabolic byproducts as the yeast equivalent of incomplete combustion, as all of these compounds contain carbon.

There’s Gold in Davis, California

On January 24, 1848, James W. Marshall found gold at Sutter’s Mill in Coloma, California. That discovery set into motion the 1849 California Gold Rush. Over 300,000 people migrated to California to seek their fortune, many traveling all of the way from the East Coast in covered wagons. Today, there is a different kind of gold in California. It is a type of gold that is precious to brewers, a microscopic gold. The topic of this entry is the wealth of Saccharomyces and non-Saccharomyces yeast species held by the University of California, Davis. The University of California, Davis (UC Davis) is home to two yeast collections. The larger of the two collections is the Phaff Yeast Culture Collection, which is named after Dr. Herman Jan Phaff. Dr. Phaff was born in the Netherlands in 1913. He migrated to California to attend graduate school at the University of California, Berkeley (UC Berkeley) when he was 26 years old. Dr. Phaff’s interest in enology and brewing was kindled at his family’s winery. After moving from UC Berkeley to UC Davis in 1954, Dr. Phaff went about building the existing UC Davis yeast culture collection into one of the largest in the world. Today, the Phaff collection holds 800 of the 1,600 known species, including those useful to brewers and vintners. The current curator of the Phaff Culture Collection is Dr. Kyria Boundy-Mills. Dr. Boundy-Mills was fortune enough to be able to work with Dr. Phaff before he passed away. A second yeast culture collection is held by the Department of Viticulture and Enology. While many of the strains held in this collection are also held in the Phaff Collection, it does contain a few brewing strains that were either culled from or apparently never held in the Phaff Yeast Culture Collection. The curator of this collection is C.M. Lucy Joseph, M.S. In addition to caring for the Enology Culture Collection, Ms. Joseph is a published expert on the Brettanomyces genus. With the above said, the cultures held at UC Davis are not for budget conscious brewers, nor are they for brewers who are not versed in aseptic transfer technique, which is a topic for a future blog entry. However, for amateur and professional brewers who are comfortable wielding an inoculation loop, the cultures held at UC Davis offer a unique opportunity to work with heirloom strains that have been forgotten by history. One of the first cultures in the UC Davis culture collections to capture my attention was UCDFST 40-219/UCDVEN 1219. UCDFST 40-219/UCDVEN 1219 is the production yeast culture that was used at the defunct Acme Brewing Company in San Francisco. The deposit was made in 1942, which makes the culture 73 years old. A little known fact is that the yeast currently used to ferment Anchor Steam has only been employed at Anchor since the mid-seventies. It is an old Wallerstein Laboratories strain. UCDFST 40-219/UCDVEN 1219 was used to produce lager beer in San Francisco at least 73 years ago. Since the Acme Brewing Company survived prohibition, it is not out of the realm of possibility that UCDFST 40-219/UCDVEN 1219’s use in San Francisco predates the Volstead Act. Another interesting fact is that Leopold Schmidt founded the Acme Brewing Company after founding the Olympia Brewing Company in Tumwater, Washington; therefore, it is also not out of the realm of possibility that UCDFST 40-219/UCDVEN 1219 is a descendant of the original Olympia production yeast strain. In use, I am not going to sugar coat things. UCDFST 40-219/UCDVEN 1219 is not much fun to grow on solid media. The colony-forming units on a plate are tiny enough to be mistaken for petite mutants. I had to contact Ms. Joseph when I went to subculture the slant on which the strain arrived from UC Davis because it appeared to be blank. According to Ms. Joseph, the culture is a diploid yeast strain. Most brewing strains are polyploids, which is yet another topic for a future blog entry. I wound up using the add a few milliliters of autoclaved 5% weight by volume (w/v) wort to the culture tube, suspend the cells that are available, and then pitch the liquid in the culture tube into a slightly larger amount of autoclaved 5% w/v wort technique because I was unable to harvest a significant yeast scrap from the slant. The truly strange thing about UCDFST 40-219/UCDVEN 1219 is that it does not behave like a petite isolate when pitched into wort. Attenuation proceeds at a pace that one would expect from any other production strain. The strain is very flocculent. The yeast aggregates into pea-sized flocs, resulting in rapid sedimentation at the end of fermentation. After struggling to get this strain to grow on slant, I was truly astonished to see how well it behaved after being grown into a culture large enough to pitch into a batch of wort. I have never experienced this kind of behavior with a yeast strain since plating my first brewing strain almost twenty-three years ago. The initial batch of wort used for experimentation with UCDFST 40-219/UCDVEN 1219 was a Pre-Prohibition-style Pilsner with an original gravity of 1.062 and a grist composed of 85% domestic 2-row and 15% flaked maize. The beer was hopped twice with Liberty. The boil length was 90 minutes with a hop addition at 60 minutes before the end of the boil and another hop addition at knockout. Primary fermentation was conducted at 15°C/59°F. The resulting flavor was very rich for such a well-attenuated beer. This strain quickly became a “keeper” in my bank. Another interesting culture that I obtained from UC Davis is UCDFST 40-420/UCDVEN 1420. UCDFST 40-420/UCDVEN 1420 was deposited by Dr. Catherine Roberts in 1947. This strain is from Kongen’s Bryghus (King Christian IV’s brewhouse) in Denmark. Dr. Roberts was quite a remarkable woman who was way ahead of her time. At a time when job opportunities for women were very limited, she was pioneering the field of yeast genetics with Dr. Øjvind Winge at Carlsberg Laboratory in Copenhagen, Denmark. Dr. Roberts earned her Ph.D. at UC Berkeley, which I assume is how the culture eventually wound up at UC Davis. If I had to describe UCDFST 40-420/UCDVEN 1420, I would say that it is like Wyeast 1007 with better flavor. Like Wyeast 1007, UCDFST 40-420/UCDVEN 1420 produces a huge head during fermentation. Apparent attenuation is very high (>80%), but flocculation is low, resulting in slow sedimentation. The strain is suitable for top cropping. UCDFST 40-420 is fantastic strain for those looking to produce Northern European ale styles. It is crisp and clean with a nice subtle candy-like ester profile that works very well with Pilsner malt and continental and British hop varieties. In closing, the cultures held at UC Davis offer advanced amateur and professional brewers an opportunity to work with heirloom strains that have been forgotten by time. There are many other brewing yeast strains that are not as old with respect to deposit date, but are equally intriguing, including Wallerstein strain #36C4 (better known as the yeast strain that was selected for use at New Albion) and old lager cultures from the Lucky Lager Brewery in Azusa, California and Liebmann Breweries in Brooklyn, New York. Brewers should not expect to receive much in the way of brewing data when digging deeply into the UC Davis collection. Opening up the vault is experimental brewing in the truest form because one never knows what one is going to get with culture collection strains. If any commercial yeast propagators are reading this blog, I have attempted to convince Chris White to license UCDFST 40-219/UCDVEN 1219 from UC Davis. He does not appear to be interested in licensing the culture. Here is an opportunity to propagate a true turn-of-the-century San Francisco yeast strain. I know that Dr. Boundy-Mills has shown interest in working with yeast propagators.

The Great Yeast Culture Adventure

First off, I would like to take a minute to thank the Experimental Homebrewing team for extending the opportunity to blog on their site. I have considered creating my own blog since re-entering the hobby a few years ago. However, seeing that my hiatus was due to severe burnout, I wanted to avoid having home brewing become the obsession that it became during my first pass through the hobby. Blogging here will allow me to share what I know with others in one convenient place without having to maintain my own site. With the above said, what brought me back to home brewing after a hiatus that was long enough to place home brewing in my rear view mirror was my love for all things Saccharomyces. I have brewed almost exclusively with home cultured yeast since the beginning. When I first started to brew in February of 1993, being able to plate and slant yeast was much more of a survival skill than it is today. The dry yeast cultures available at the time were unreliable and liquid yeast was difficult to obtain due to the relative immaturity of the market. White Labs did not exist, and the Wyeast catalog could be easily memorized due to the small number of available cultures. As the hobby matured and high-quality yeast became more readily available, my desire to have regular access to high-quality yeast morphed into the desire to have greater control over the final product. The difference between an okay beer and a very good to great beer often lies in biological quality control because brewers make wort, yeast makes beer. My blog will deal almost exclusively with the care and feeding of the Saccharomyces genus. While I am not into wild yeast and bacteria, much of what will appear on my blog will apply to wild cultures as well. I do not work with wild yeast and bacteria because I maintain a yeast bank, and these microbes are known as beer spoilage microflora for a reason. White Labs maintains two separate propagation facilities. The Saccharomyces facility is held under positive pressure to keep things out whereas the Brettanomyces and bacteria facility is held under negative pressure to keep things in. In closing, I would like to give credit to three people who appear to be no longer active in the hobby, but whose contributions should not go unrecognized. Dr. Maribeth Raines’ pioneering work in collecting and isolating yeast cultures and Jeff Mellem’s entrepreneurial skills brought us BrewTek. There are several cultures available today because of the work performed by these two pioneers. One culture that readily comes to mind is Wyeast 1450 Denny’s Favorite 50. This culture was first introduced to the home brewing community on mini-slant as BrewTek CL-50 California Pub Brewery Ale. It is still with us due to Denny Conn’s effort to keep CL-50 alive after BrewTek went out of business. Another pioneer in this area of home brewing was Dr. Daniel McConnell. Dr. McConnell transferred several hundred brewing cultures that he had collected over the years to White Labs when he shuttered the Yeast Culture Kit Company. The hobby is much richer because of the contributions made by these three individuals.

Old Dog…New Tricks

Well, today I’m breaking out of my comfort zone and trying a new yeast starter method. For many years, my standard practice for a starter for an ale in the mid 60s gravity range has been to build a 2-3 qt. starter on a stir plate. I’d let the plate run 3-5 days, then put the starter in the fridge for 2-3 days to crash out the yeast. I’d decant, then pitch the slurry. It always seemed to work well, but…..

Enter Mark Van Ditta, AKA S. Cerevisiae on the AHA forum (https://www.homebrewersassociation.org/forum/). Mark’s wealth of knowledge about brewing yeast is breathtaking…he knows stuff I didn’t even know you could know! He has been advocating for making a “shaken, not stirred” starter and pitching it at high krausen rather than crashing and decanting. I have always told him that I’ve tried that and didn’t care for the results. But I decided that it was time to ditch the old fogey attitude and actually give his method a try. Which brings us to a couple days ago.

Today is Friday, 9/25/15. Last Wed. I pitched a 3 month old Wyeast smack pack of 1450 Denny’s Fav 50 (surprised?) into a 1 qt. 1.035ish OG starter at about 2 PM. By the next morning, although I didn’t see much in the way of krausen, when I shook the starter it foamed up and was obviously fermenting. Because I wasn’t ready to brew yesterday, I realized that I was gonna miss high krausen, but I figured it was close enough. I had somewhere between 3/8-1/2 inch of slurry in the bottom of my starter.

I didn’t have time to conduct this as a true “experiment” by splitting a batch of wort and pitching a different starter into each half, so I chose a recipe I know well…my Noti Brown Ale, an American style brown (http://wiki.homebrewersassociation.org/NotiBrownAle). This was the first beer I ever won an award for and I’ve brewed it many, many times.

I ended up pitching my starter at 2:30 PM into 63F wort, and placed the fermenter in my chest freezer set to 63F. 5 hours later I saw the beginning of fermentation. By the next morning, 17 hours later, the fermentation was in full swing. This time schedule was pretty much on par with what I see when I pitch a larger starter or a slurry, so there was no change in lag time. The krausen looks beautifully tan and healthy.

So far, there hasn’t been a downside to this technique. The starter was simpler to make and tool less DME, so it was less expensive than my usual starter. Of course, the proof is in the glass. I’ll report on the finished beer in a couple weeks or so.

UPDATE: Since writing this, Mark laid some new info on me….the size of the starter vessel matters! Apparently, there should be a 4:1 ratio between the size of the vessel and the amount of starter wort. More info….https://www.homebrewersassociation.org/forum/index.php?topic=24447.msg31…